

A Worker's Inbox and Calendar
A worker that triages mail, answers customers, or is invited to your team's meetings needs an address of its own and a week you can see. In Backbuild each Virtual Worker can hold one email inbox, owned by the worker itself, and its page carries two tabs for supervising it: Email, which opens that inbox in the full Backbuild Mail client, and Calendar, which shows the worker's working hours, holidays, and the invitations sent to it for any week. After this page you will be able to give a worker an inbox, know exactly who can read it, and check at a glance when the worker is on shift and what it has been invited to.
Giving a worker an inbox uses Backbuild Mail and an email domain whose ownership your organization has verified (see Sending Domains). You need to be the person who hired the worker, or one of your organization's owners or administrators the worker is shared with as Can edit, and creating a new inbox needs the same permission as creating any other mailbox in your organization.
The Owner Rule: Who Owns a Worker's Inbox
After this section you will be able to answer, for any worker, who owns its inbox and who can read it. Every inbox in Backbuild has exactly one owner. When an inbox becomes a worker's, the worker becomes its owner, and the person who hired the worker holds owner rights on it through the worker. Who happened to create the inbox never decides who owns it. That gives you one simple rule to reason with: whoever owns the worker owns its inbox.
- Assigning moves the inbox to the worker. When you assign an inbox you own, ownership passes to the worker, and owner rights go to whoever owns the worker. If you hired the worker you keep them, so you can still read the inbox, manage its settings, and delegate it; an administrator who assigns their own inbox to a worker someone else hired passes the owner rights to that person.
- Replacing an inbox hands the old one back. When you give a worker a different inbox, the one it held before returns to the person who hired the worker. Nothing is orphaned.
- Firing keeps everything in place. A fired worker keeps its inbox, and its owner keeps owner rights, so re-hiring the worker brings it back to the same address and the same mail.
- Delegates stay delegates. People the inbox was already delegated to keep their access; the owner can revoke it at any time. Being able to see a worker, or holding a share on it, does not by itself let someone read its inbox.
Three assignments are refused, each with a plain message, because each would hand an autonomous worker something it must not hold:
- An inbox you do not own. You can assign only an inbox you own. An inbox delegated to you, or one whose owner's rights are limited by your organization's sharing or classification policy, cannot be given to a worker.
- An inbox that belongs to another worker. The message says to unassign it there first. There is no separate unassign action in this release: give that worker a different inbox, and the one it held returns to the person who hired that worker.
- A sign-in address. Your account's own email address, a verified sign-in alias, and an inbox created for you by a member invitation can never be assigned to a worker, because the worker would then receive your account recovery and sign-in mail.
Can I give my own inbox to a worker? Only an inbox you own that is not a sign-in address. Your account email is a sign-in address, so it is always refused. Create a dedicated inbox for the worker instead, such as support@ or nova.reyes@ on your organization's domain.
Can two workers share one inbox? No. An inbox belongs to at most one worker at a time, and assigning one that another worker holds is refused until that worker is given a different inbox.
Giving a Worker an Inbox
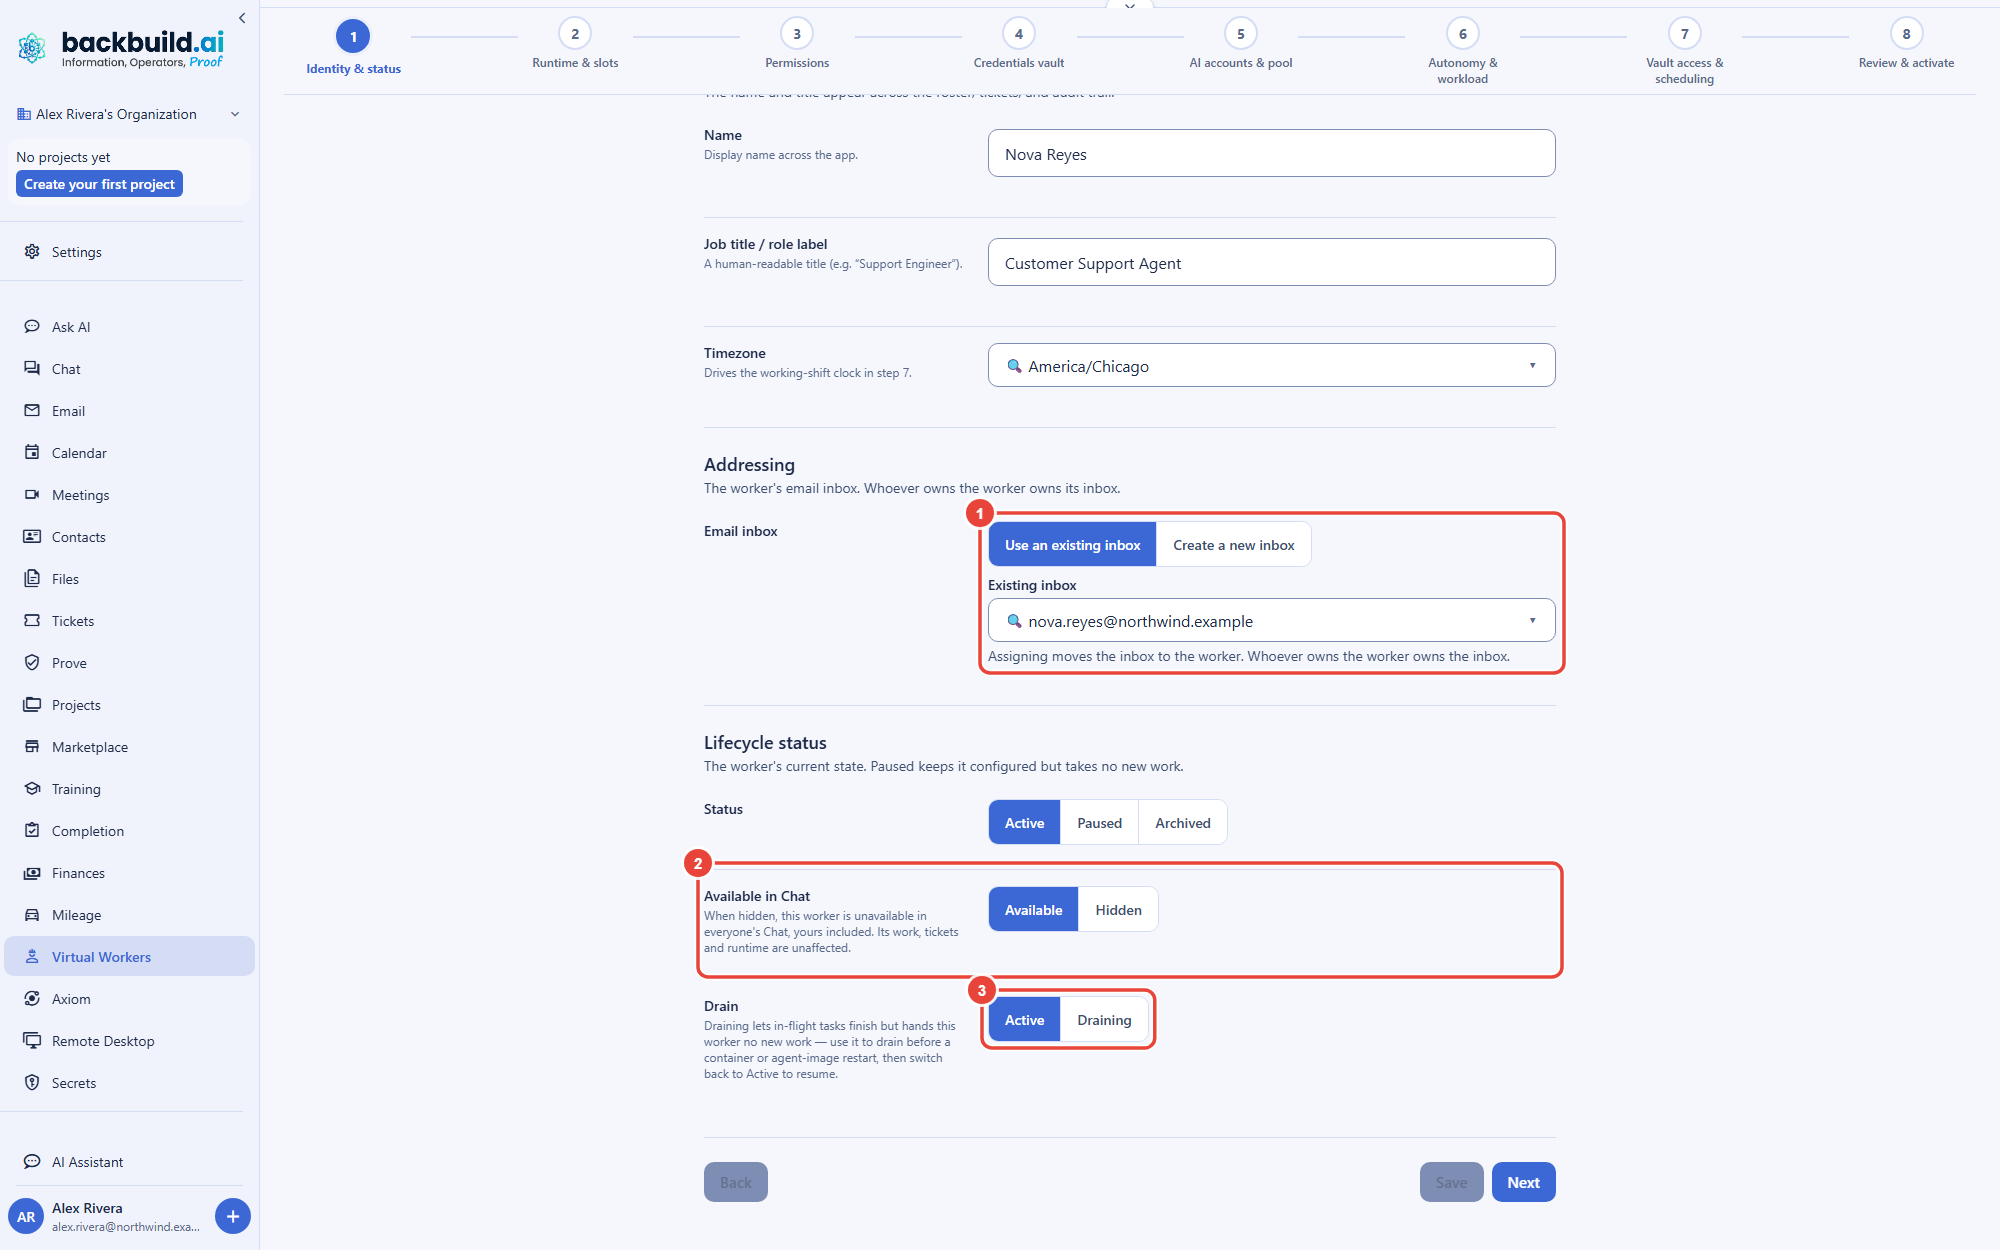
After this section you will be able to assign an existing inbox or create a new one, at hire time or later. The same inbox picker appears in two places: the Hire a worker form, under Persona, then Reporting and email, and the worker's Configure wizard, under Identity & status, then Addressing. It offers two choices.
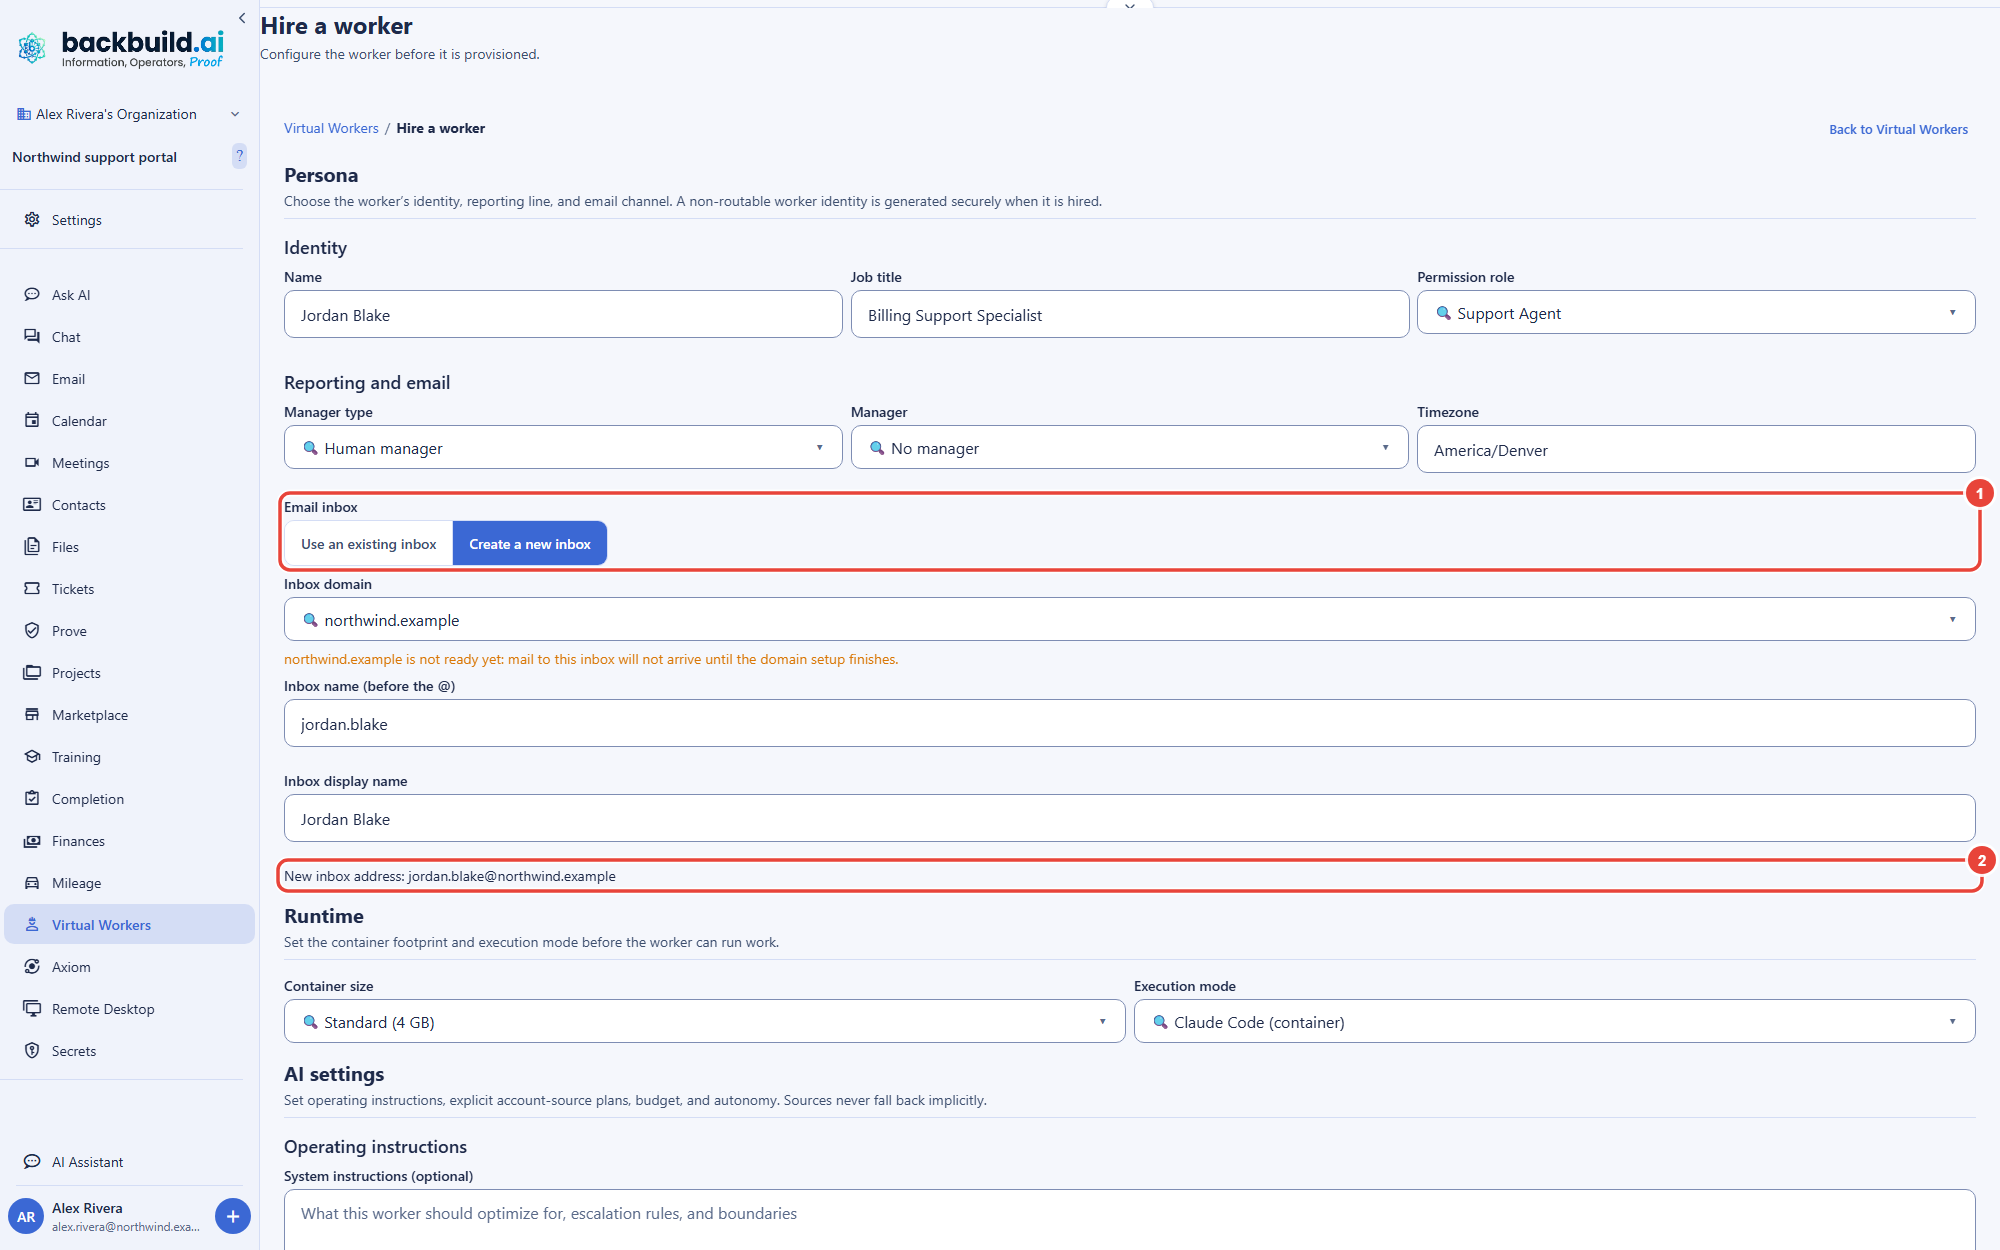
Use an existing inbox
The Existing inbox list offers only the inboxes you own that you are allowed to assign, plus the worker's current inbox. Inboxes you can read but do not own, and inboxes held by other workers, are not offered. Below the list the picker always reminds you that assigning moves the inbox to the worker. If you own no inboxes yet, it tells you so and points you to the second choice.
Create a new inbox
- Inbox domain. Every email domain of your organization is listed. Domains that send and receive mail come first, then the other domains whose ownership is verified, then unverified domains, which are shown but cannot be chosen until their ownership is verified. A domain whose setup is not finished carries a note that mail will not arrive at the new inbox until it is.
- Inbox name (before the @). Prefilled from the worker's name, for example nova.reyes. Use 1 to 64 lowercase letters, digits, dots, underscores, or hyphens. Reserved names such as postmaster, abuse, admin, and security are refused.
- Inbox display name. Prefilled with the worker's name; it is the name recipients see.
- Check the preview. The line New inbox address shows the full address. If you type an address you already own, the picker assigns that inbox instead of creating a duplicate.
In the hire form, the inbox is created and assigned the moment you choose Hire worker, in one step, so an inbox is never left created but unassigned; if the inbox cannot be created, the worker is still hired without one and the message says what to fix. In Configure, choose Create inbox and assign and the picker confirms with the new address. Choosing an existing inbox in Configure is saved with the step, when you select Next or Save.
Our domain does not appear, or cannot be chosen. Why? A new inbox can only be created on a domain whose ownership your organization has verified. Add and verify the domain under Settings, then Email Domains; in Configure the picker offers an Open Email Domains button for this. In the hire form, hire the worker first and create its inbox later from Configure, so the form you filled in is not lost.
What if the address is already taken? If the address is one of your own inboxes, the picker assigns it instead. If it belongs to another worker, the picker tells you to unassign it there first, which you do by giving that worker a different inbox. If someone else owns it, choose another name.
The Email Tab
After this section you will be able to read and act on a worker's mail from its page. As soon as a worker has an inbox, its page shows an Email tab directly after Configure. The tab opens the worker's inbox in the full Backbuild Mail client, with the folder rail, the message list, the reading pane, search, labels, filters, and compose, pinned to that one inbox. There is no mailbox switcher inside the tab, so you always know whose mail you are looking at. The tab needs no running container, so it is available even while the worker is off shift.
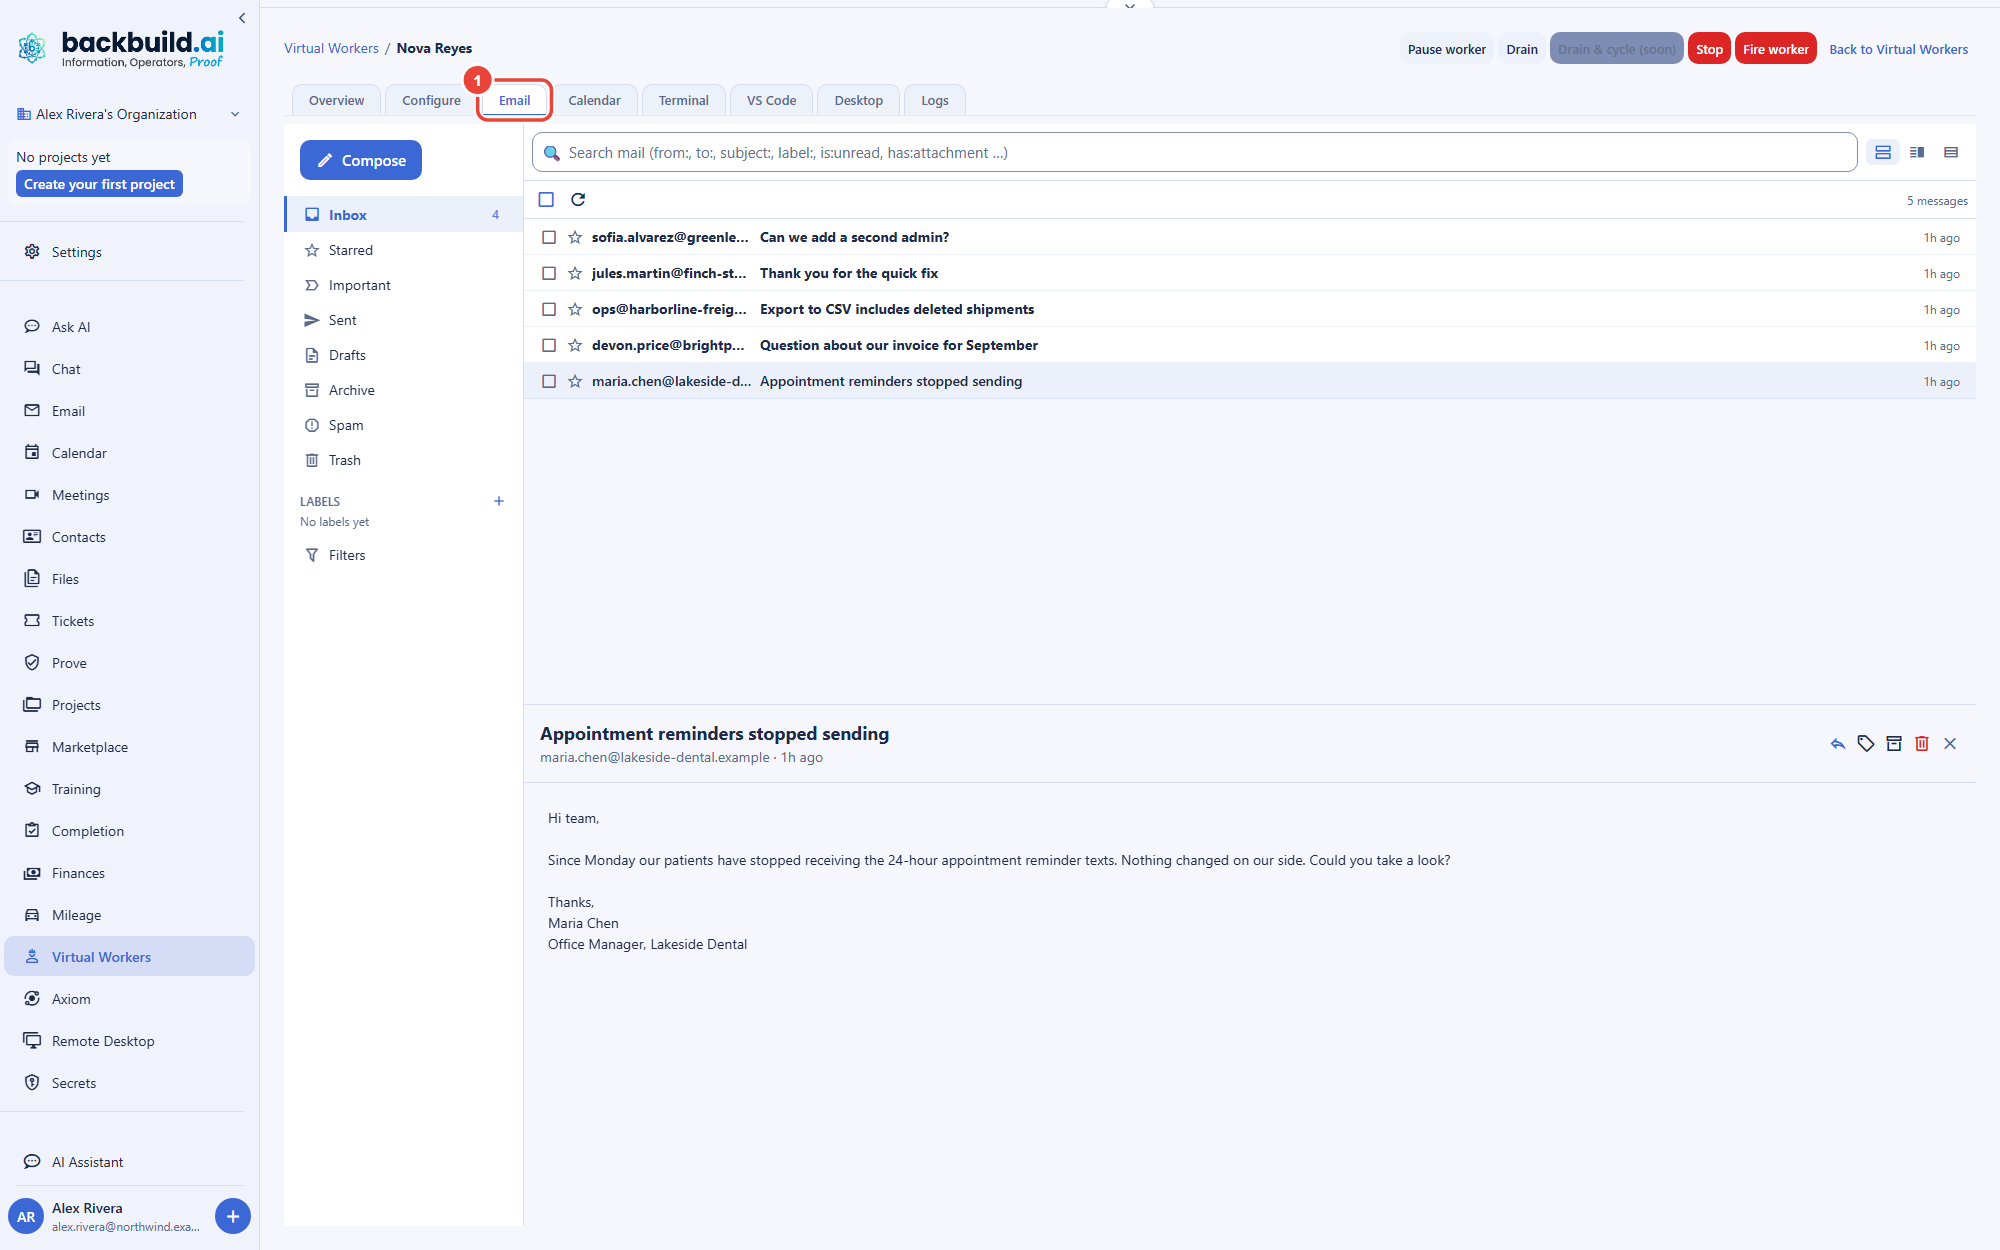
- Who can open it. The worker's owner, and anyone the inbox has been delegated to. Anyone else who can see the worker sees a clear message instead: You do not have access to this worker's mailbox, with an explanation of who can read it.
- What you can do. Your own rights on the inbox decide. A person with read-only delegation sees a read-only banner and can read the mail but not change it.
- Whose action it is. Anything you do in the tab, such as replying, archiving, or labelling, is done by you and recorded as yours. It is never attributed to the worker.
- Moving around the page. The worker's tabs work from the keyboard: the Left and Right arrow keys, Home, and End move between tabs, and Enter or Space opens the one you are on. Inside the tab, the Mail client's own keyboard shortcuts apply.
The worker's inbox also appears in your main Email screen. When you can read more than one inbox, the mailbox switcher beside the search box lists the inboxes of the workers you own in their own Virtual workers group, each under the worker's name. Your own inbox stays the one the Email screen opens by default; a worker's inbox is never mistaken for yours. See Work From Several Mailboxes.
The Calendar Tab
After this section you will be able to see, for any week, when a worker is on shift and what it has been invited to. Every worker's page has a Calendar tab. It shows one week, Monday first, in the worker's own timezone, and it is a read-only view: you change the worker's hours in Configure and you invite it to meetings from Backbuild Calendar.
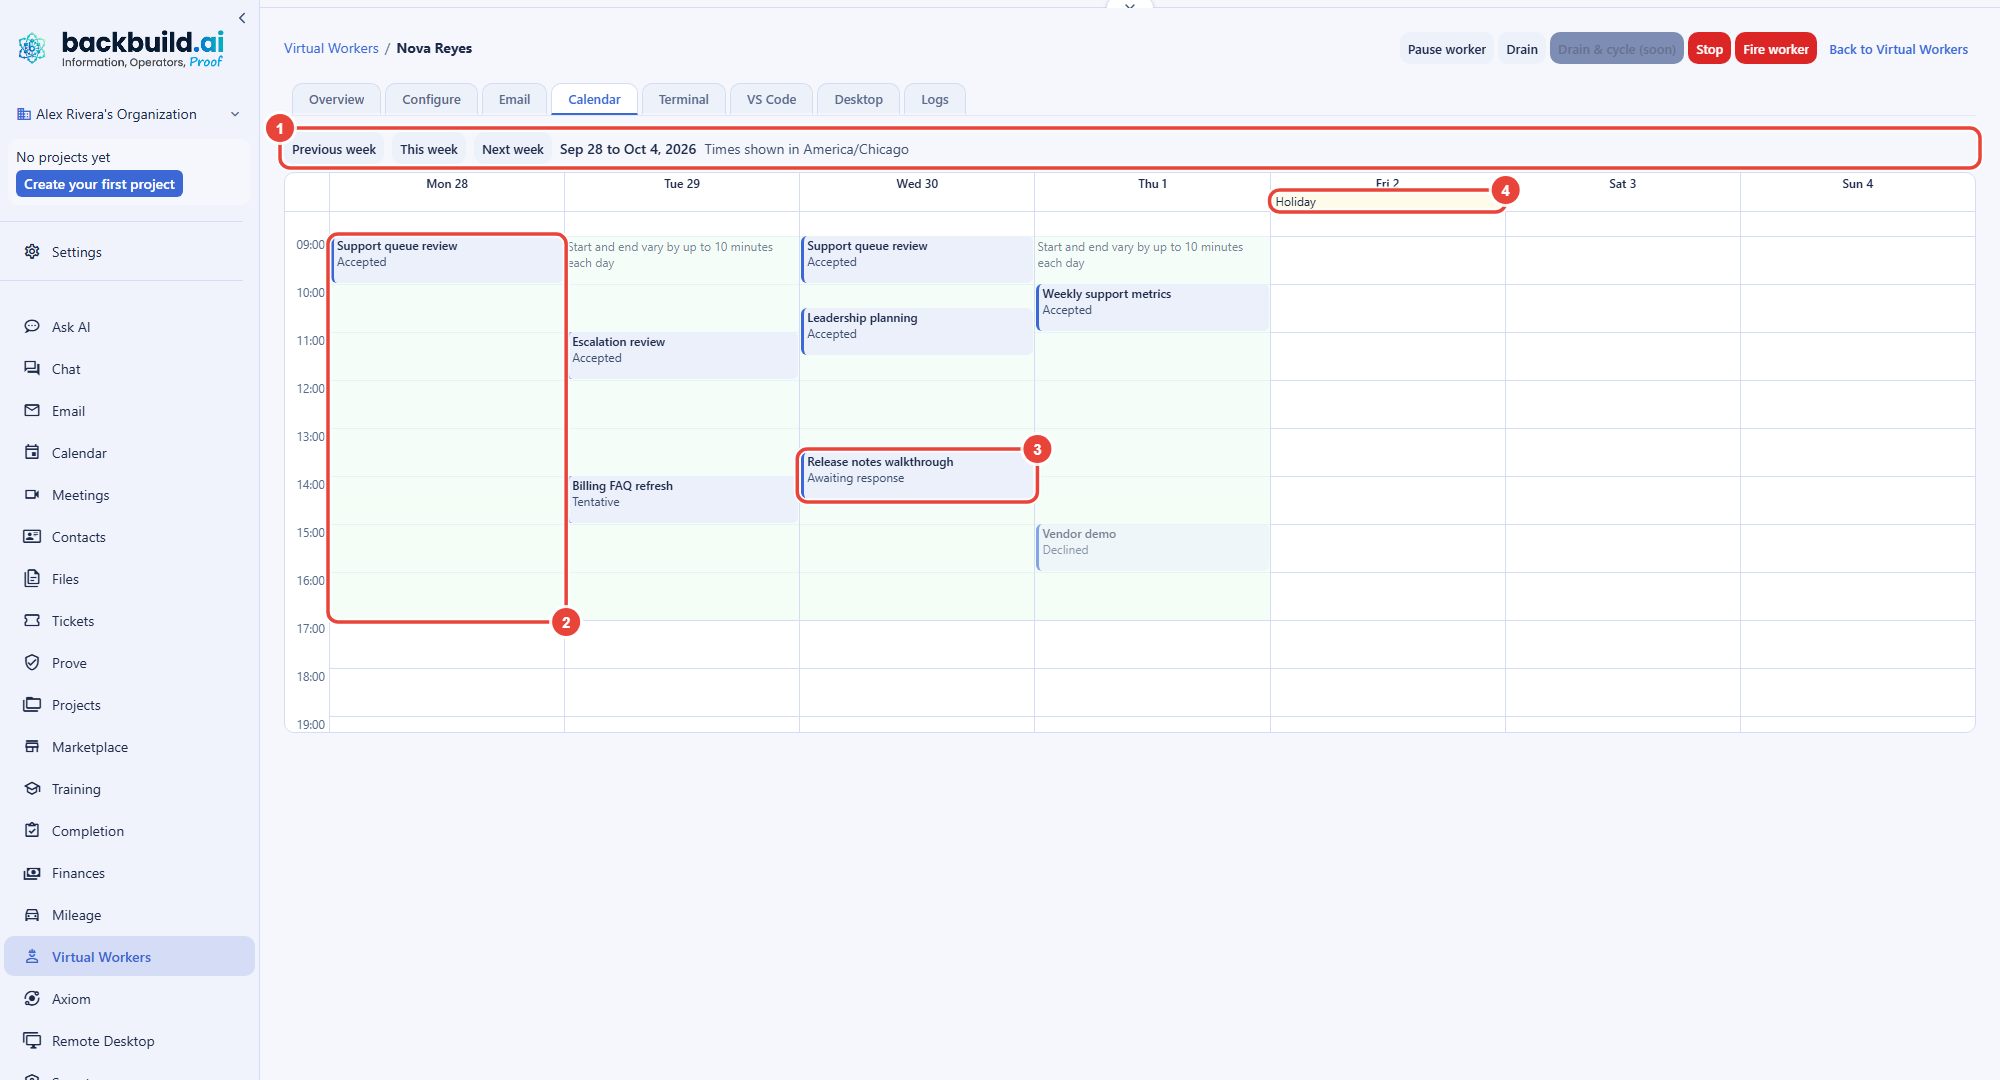
- Moving between weeks. Previous week and Next week step one week from the week you last asked for, and This week returns to today. The week on screen stays visible while the next one loads.
- Work hours. Each working day carries a tinted block for the hours the worker's shift sets. When the shift has a start and end offset, the block says so: start and end vary by up to that many minutes each day, so the worker does not clock in at the same instant every day. The times are the ones the worker's scheduler uses, so the tab never disagrees with when the worker actually works.
- Holidays. A full-day holiday removes the day's work hours and shows a holiday marker; a partial-day holiday is marked but leaves the hours in place. The marker's label is read out by screen readers.
- Invitations and events. Each block shows its title and the worker's response: accepted, tentative, declined (dimmed), or awaiting response. Invitations are shown in the primary color and events on the worker's own calendar in the information color.
- Private events. A private or confidential event you are not part of shows as a busy block titled Private event, with its time but no title, organizer, or details. The tab never shows an event's description, location, attendee list, or attachments.
- Timezone. Times are shown in the timezone of the worker's shift, or of the worker itself. If that zone is not valid, the tab says so instead of guessing, and work hours are not drawn.
An invitation reaches the tab when someone invites the worker's address from Backbuild Calendar. An invitation emailed to the worker as a calendar attachment from another system arrives in the worker's inbox as a message, and it is not added to the Calendar tab. A worker with no shift shows no work hours, and the tab says so.
How do I invite a worker to a meeting? Add the worker's inbox address as a guest when you create the event in Backbuild Calendar. The invitation then appears on the worker's Calendar tab with its response.
Who can see a worker's calendar? The person who hired the worker and the people it is shared with. Your organization's owners and administrators see every worker on the roster, but a worker someone else hired opens its Calendar tab for them only if it is shared with them. Seeing the worker is not a delegation of its invitations, so the tab shows only what supervising the worker needs, and private events stay private.
Where to Next
- The Configure Wizard: every step of a worker's configuration, including Addressing and the working shift the Calendar tab shows.
- The Worker Page: the Overview, the lifecycle controls, and the live Terminal, VS Code, and Desktop surfaces.
- Mailboxes and Inbox: the Backbuild Mail client the Email tab opens, and the mailbox switcher.
- Security and Governance: how a worker's identity, mailbox, and credentials are governed.