

Setting Up Automatic Tracking in Backbuild Miles
Automatic tracking is the whole point of Backbuild Miles: you drive, and a mileage log builds itself. Whether that actually happens is decided in the first two minutes, by a short setup wizard that explains what is recorded and then asks your phone for the permissions the app needs. This page walks every step of it, tells you what each permission is actually for, and shows you how to confirm afterwards that your phone is recording rather than merely claiming to. After this page you will have tracking set up correctly and you will know how to tell, at a glance, that it is still working.
Why This Page Exists
After this section you will know what goes wrong with mileage apps, and why setup is where it goes wrong.
The single most common complaint about every automatic mileage tracker, from every vendor, is not that it recorded the wrong thing. It is that it recorded nothing, quietly, for days or weeks, and the driver only found out when they went looking for a trip that was not there. Almost always the cause is a permission: one that was never granted, or one the operating system took back later to save battery.
That is why setup is staged rather than a single wall of prompts, why every stage tells you what the permission is for before it asks, and why Backbuild Miles keeps checking afterwards and tells you when something has lapsed. The two minutes you spend here are the difference between a log you can hand to an accountant and a log with holes in it.
Starting Setup
After this section you will be able to open the wizard, whether it is your first run or you are coming back to it.
The first time you sign in to Backbuild Miles, setup opens by itself. You do not have to find it. Until you have worked through it, the app will keep taking you back to it rather than letting you sit on a dashboard that cannot record anything.
You can also run it again at any time: Settings, then Re-run setup and permissions under "Setup and review". Doing that is harmless. It walks the same stages, and anything you have already granted is left alone.
Setup will also reappear on its own if the disclosure changes. When Backbuild Miles materially changes what it tells you about the data it records, your previous agreement no longer covers the new text, so you are shown it again and asked afresh. That is deliberate: an agreement you were never shown is not an agreement.
What Backbuild Miles Records, and Who Can See It
After this section you will know exactly what leaves your phone, and you will be able to answer the question every driver asks first.
The second stage of setup is a disclosure, and it is the one stage you cannot skip. Nothing that collects location is asked for until you have read it and continued.
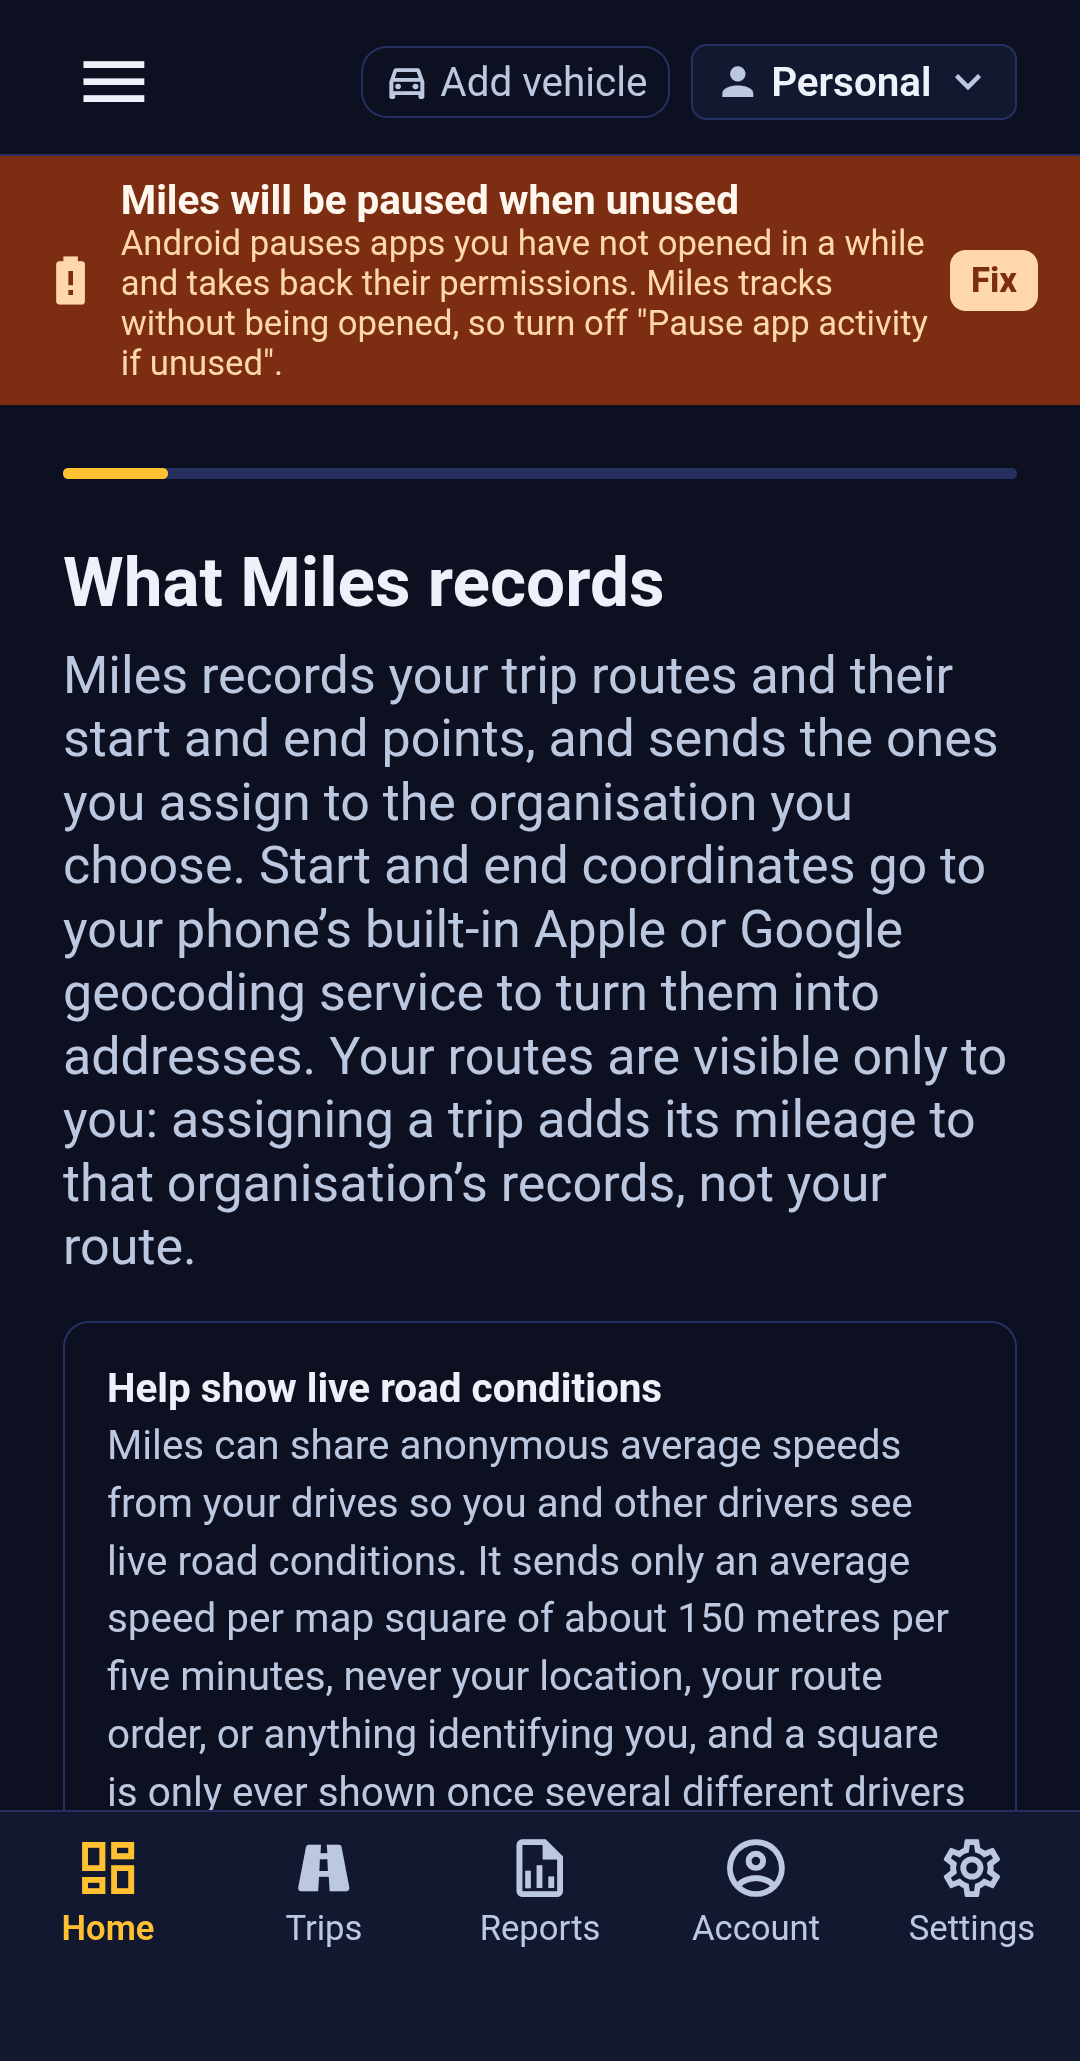
Three things are worth being precise about.
Your routes are yours. Backbuild Miles records the route of each trip and where it started and ended. When you assign a trip to an organization, what that organization receives is the trip's mileage, for its records, not the path you drove. Nobody in that organization can pull up your route. There is no live view of where you are, for anyone, at any time.
Addresses come from your phone, not from us. To turn a pair of coordinates into "Main Street, Springfield", the start and end points go to the geocoding service already built into your phone, which is Apple's on an iPhone and Google's on an Android device. That is the same service your maps app uses.
Nothing is recorded until you finish. Accepting the disclosure does not switch tracking on. The last stage of setup does, with a button that says so.
The road-speed question, which is separate
On the same screen, in its own panel, Backbuild Miles asks a second and genuinely different question: whether to contribute anonymous average road speeds, so that you and other drivers can see live road conditions.
Everything else in this app is recorded for you. This one sends something outward, so it is asked separately and it has its own switch. What gets sent is an average speed for a map square of roughly 150 metres, per five minutes. What does not get sent is your location, the order you drove in, or anything that identifies you, and a square is only ever shown to anyone once several different drivers have contributed to it.
It starts switched on. Turn it off here if you would rather not, and your own mileage logging is completely unaffected. You can change your mind whenever you like: Settings, then Live road speeds. Switching it off there stops the contribution immediately and discards anything your phone had collected but not yet sent, and it does that on the phone itself, so it works even with no signal.
Where Trips Go, and Which Vehicle They Belong To
After this section you will know what the two middle stages are for and when you can safely skip them.
Setup then asks where your trips should go, and which vehicle you drive. Neither is required to start recording, and both are easy to change later.
Destinations are the organizations you drive for. You start with a personal one, and you can add another (a gig, a business, a client) at any time from the organization menu at the top of the app. Anything you do not assign to an organization stays personal. If you drive for a single organization, Backbuild Miles can assign trips for you; if you drive for several, you pick per trip, and Clearing Your Trip Inbox covers how that works day to day.
Your vehicle matters for tax rather than for tracking. Setup asks you to add the vehicle you drive and record its current odometer reading: every trip is logged against a vehicle, and the odometer reading is what turns the mileage into a record you can deduct. Your Vehicles covers adding one properly, including the details that make the record stand up. If you skip it here, add one, and its odometer reading, before you file anything.
The Permissions, and What Each One Costs You
After this section you will understand what you are agreeing to at each prompt, and what specifically stops working if you decline.
The rest of setup asks for one permission at a time, each with the reason attached, and each of them can be skipped. Skipping is not punished: the app carries on, and tells you afterwards exactly what is missing. But the permissions are not interchangeable, and the consequences differ.
Location while using the app
The first and mildest. It lets the app see where you are while it is open, which is enough to watch a drive record on screen but not enough to record one while your phone is in your pocket.
Choose Precise rather than Approximate. An approximate position is accurate to a neighbourhood, which cannot produce a distance you would put on a tax return, so Backbuild Miles treats it as not granted and says so.
Location all the time
This is the one that makes tracking automatic, and it is worth reading the prompt carefully because the operating systems handle it differently.
On Android 11 and later, the system does not offer "Allow all the time" in a pop-up. The app sends you to its own entry on the operating system's Location page, where you choose it from the list, then you come back and setup carries on from the next stage.
On iPhone, iOS asks in two steps by design. You will grant "While Using the App" first, and some time later iOS itself offers to change it to "Always Allow". Choose that when it appears.
Decline this one and Backbuild Miles is still usable, but only as a manual tracker: you open it, you drive, you stop. Nothing is captured when the app is closed.
Motion and activity
Motion data is how the app notices that a drive has begun without keeping the GPS running all day. Refusing it does not stop tracking. It makes the app work harder for the same result, which you will notice as battery.
Notifications
Android 13 and later ask for this separately. It is how Backbuild Miles tells you that tracking has stopped. Refusing it does not stop tracking either, but it removes the warning, and the alternative to being warned is discovering the problem when a trip is missing.
The battery exemption, which is the one that matters most
On Android, this is the stage to get right. Android aggressively suspends apps that run in the background, and a mileage tracker running in the background is exactly what it targets. Exempting Backbuild Miles from that is the single biggest reason drives are or are not missed.
Pressing the button on this stage opens Backbuild Miles's own page in your phone's settings. From there choose Battery, then Unrestricted. It is two taps, and it is the difference between a tracker that survives a working day and one that goes quiet after an hour in your pocket.
While you are on that page, there is a second setting worth turning off: Pause app activity if unused. Android will otherwise revoke the permissions you just granted if you have not opened the app in a while, and a mileage tracker that is working correctly is precisely an app you never open. Backbuild Miles will warn you if this one is on.
Turning Tracking On
After this section you will have automatic tracking actually running.
The last stage is the one that arms it. The button reads Turn on automatic tracking, and it says that rather than something vaguer because pressing it is what starts background location capture. Nothing before this point records anything.
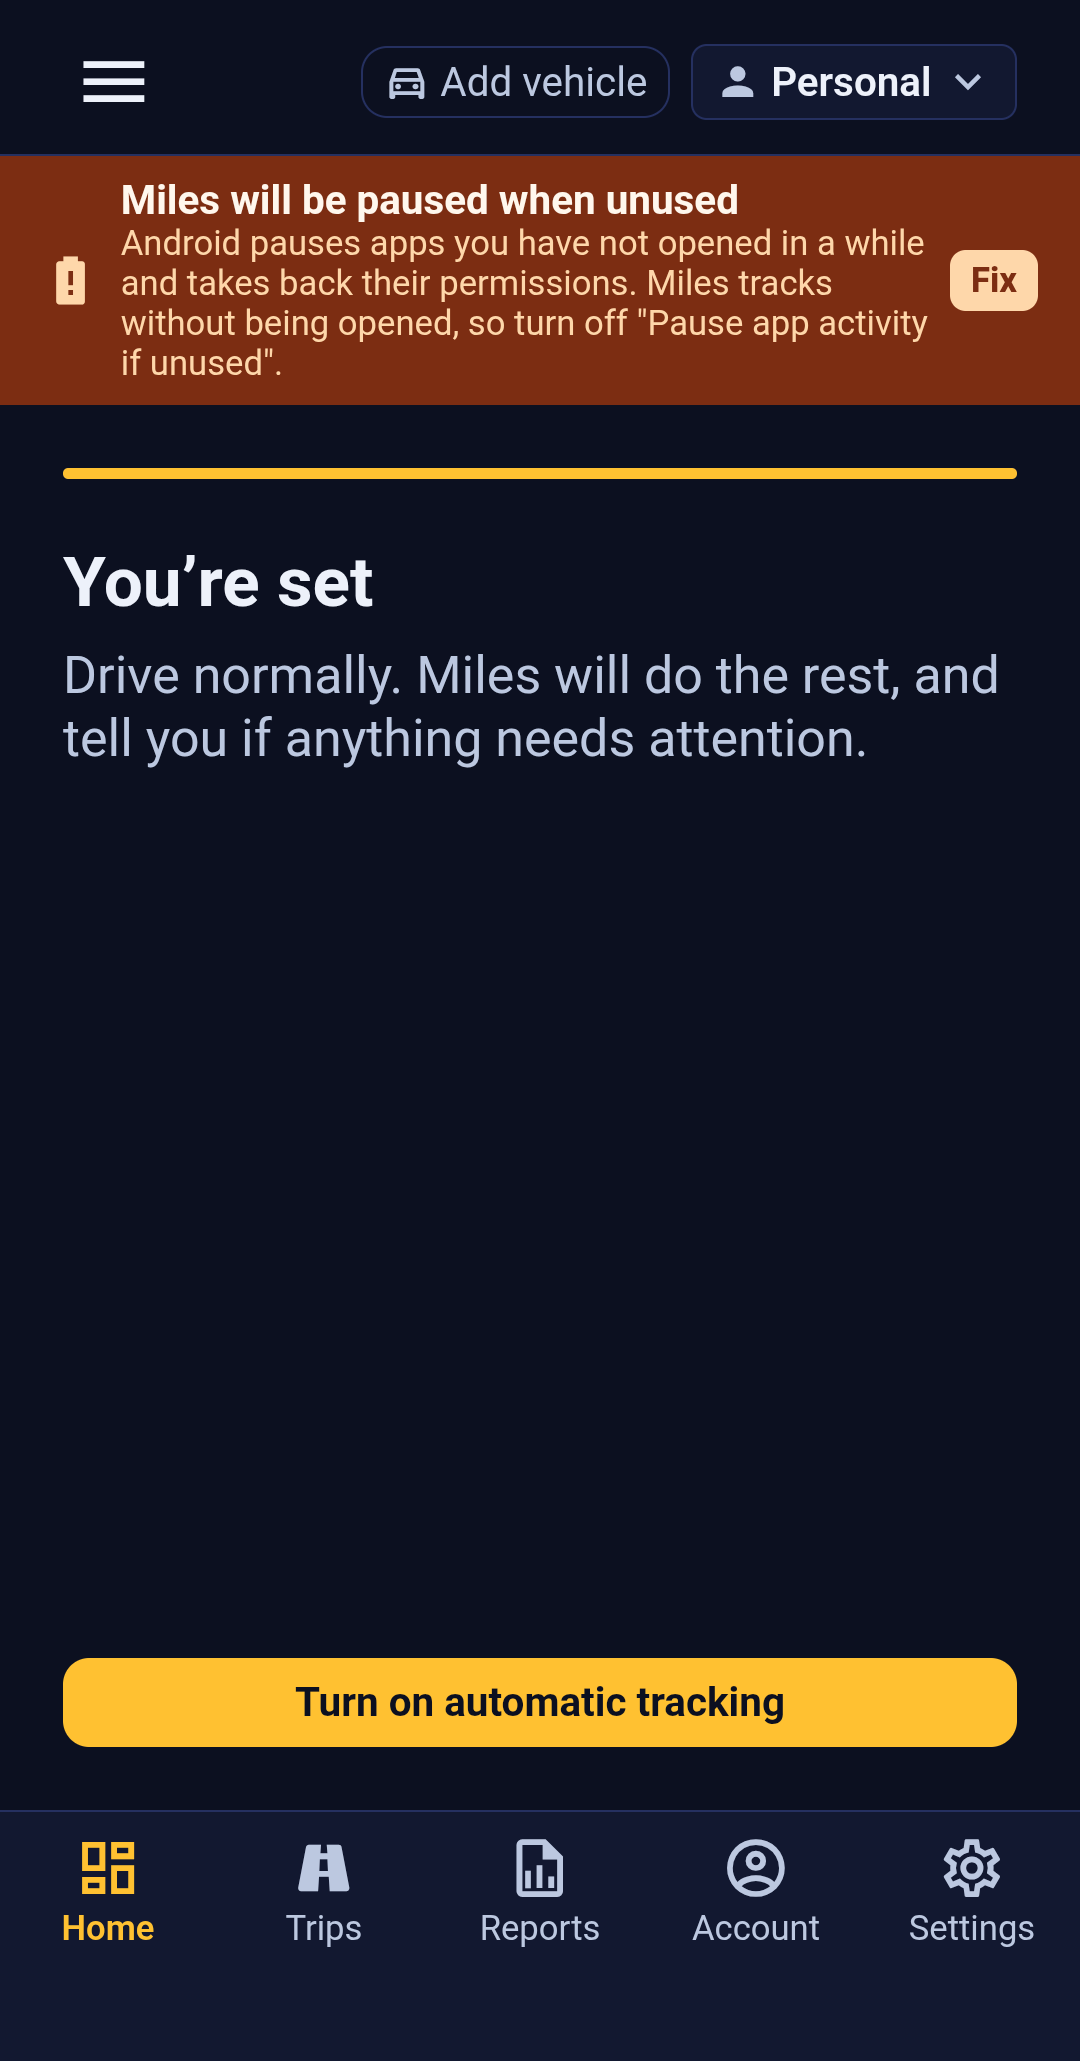
If you skipped any permission, this stage says so before you press it, listing what is still needed. It reads that list from your phone rather than from what the wizard remembers asking for, so a permission you granted by wandering off into your operating system's settings is correctly counted as granted.
After that, drive. There is no button to press at the start of a journey and nothing to remember at the end.
Confirming It Is Actually Recording
After this section you will be able to tell, in seconds, whether your phone is tracking or only claiming to.
This is the habit worth building, because it is the one that catches the failure this whole page is about.
Backbuild Miles watches its own permissions and its own capture, continuously, and puts a banner at the top of every screen when something is wrong. The banner names the specific thing that is missing rather than saying tracking has a problem, and it offers the fix.
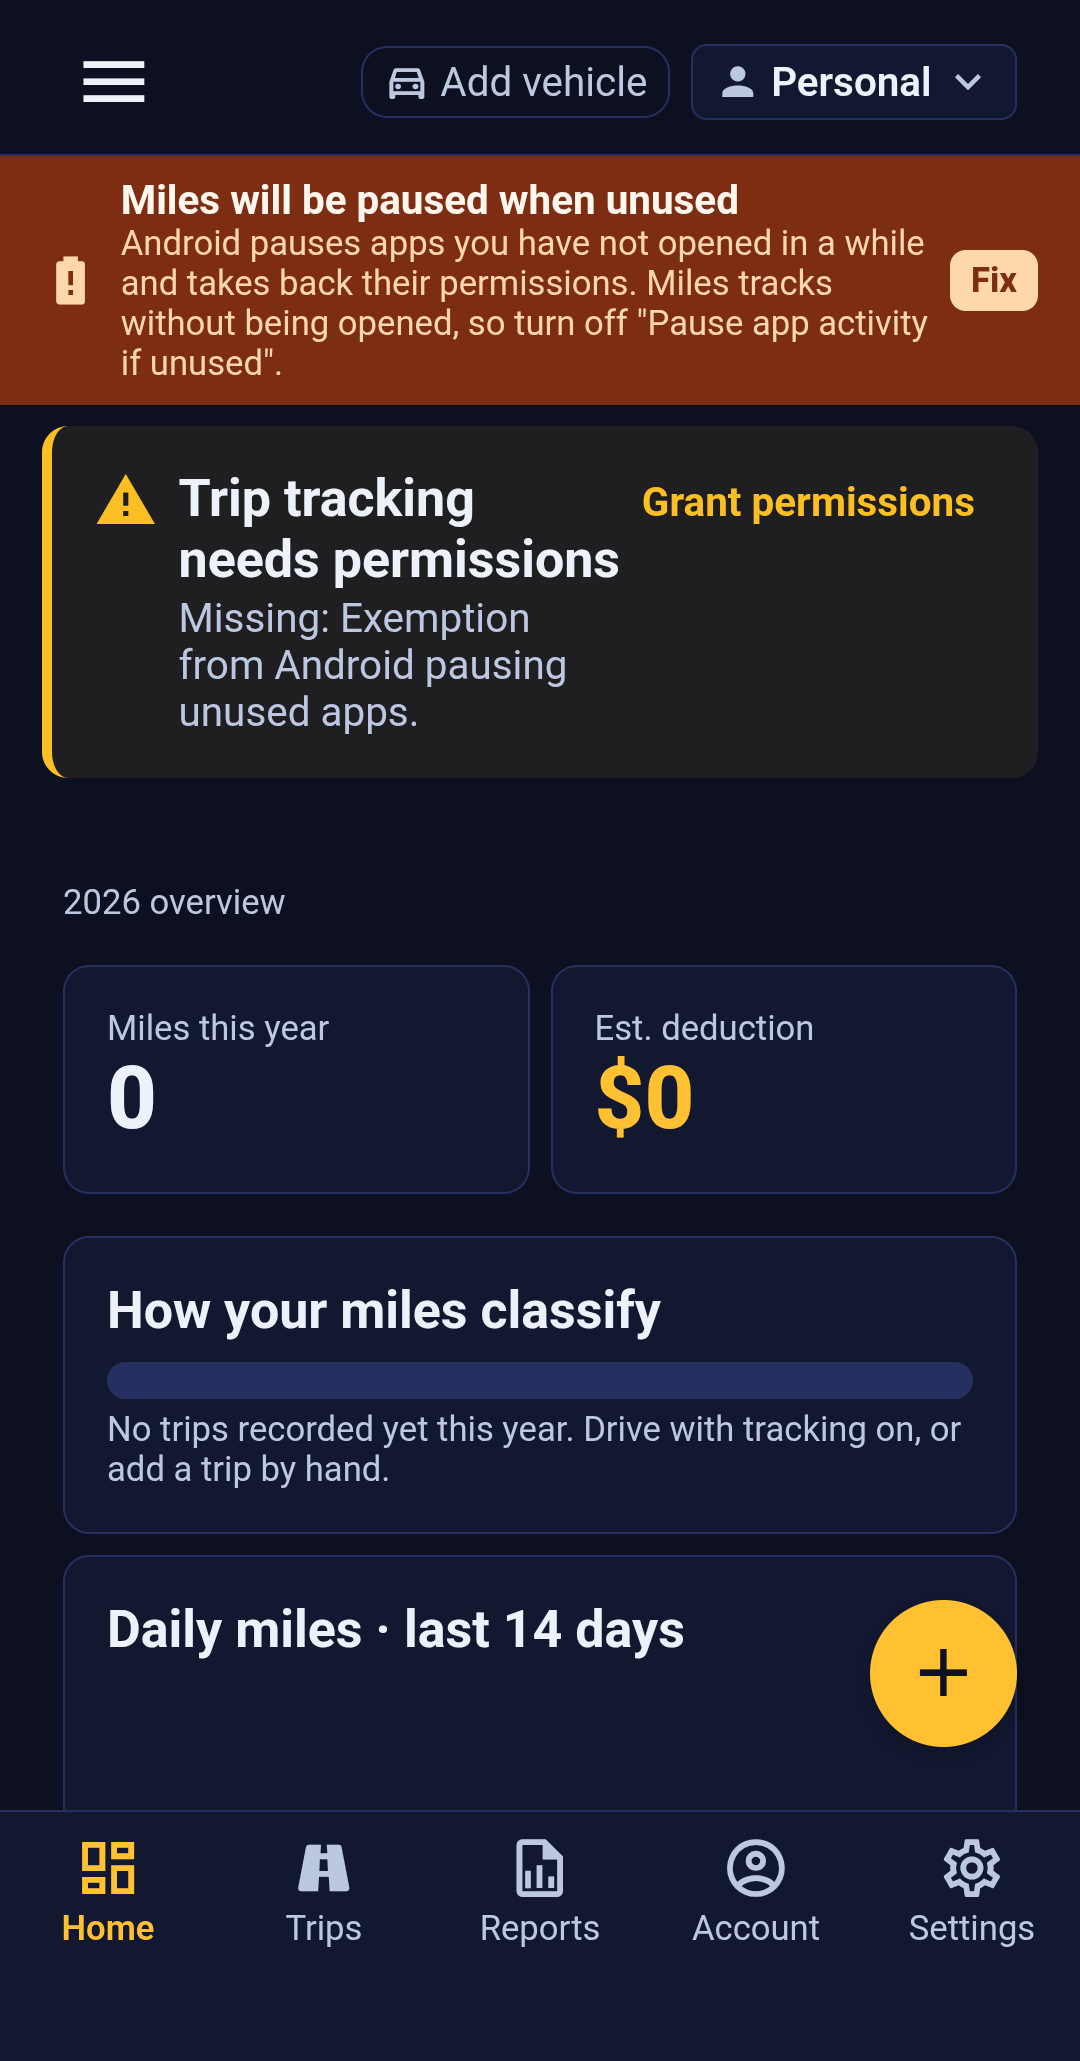
What the banners mean:
- "Automatic tracking is not set up" means you have not finished the wizard. Nothing is being recorded.
- "Automatic tracking is off" means you finished it and the master switch is off. Nothing is being recorded, and turning it back on is one tap.
- "Automatic tracking is not running" is the important one: the switch is on and nothing on the phone is actually capturing. Switching it off and on again in Settings restarts it.
- "Trip tracking needs permissions" or "Trip tracking is degraded" names the specific permission that is missing or was taken back.
No banner means it is working. The app stays silent only when a capture producer has genuinely reported itself armed, so an empty screen is a measurement rather than an assumption.
One case the app reports after the fact rather than while it happens: if your phone restarts, Android does not let any app run until the phone has been unlocked once. Backbuild Miles cannot record during that window and does not pretend otherwise, so when it comes back it tells you how long the gap was, which is enough to know which drive to check. Because that window is already closed and there is nothing left to fix, this is the one banner you can Dismiss once you have seen it; every other banner names a live problem and stays until it is actually resolved.
Changing Your Mind Later
After this section you will know where every choice from setup lives afterwards.
Everything setup asked is in Settings and everything can be changed:
- Automatic tracking is the master switch. Off means nothing is recorded at all, and the app will keep telling you so rather than letting it be a silent choice you forgot about.
- Live road speeds is the contribution from the disclosure screen, with the same wording, effective the moment you change it.
- Permissions are shown with their live state, each with a link straight to the operating system page that fixes it.
- Re-run setup and permissions walks the whole wizard again.
Your Mileage Settings covers the rest of that screen, including distance units and where trips are assigned by default.
Common Questions
Can my employer see where I have been?
No. Your routes are visible only to you. Assigning a trip to an organization adds that trip's mileage to its records; it does not hand over the path you drove, and there is no live location view for anyone. Trips you never assign stay personal.
Does it track me when I am not working?
The app records drives whenever tracking is on, because it cannot know which ones matter until you tell it. What you do with them is yours: anything you do not assign to an organization stays personal and is never sent to one. If you would rather it not record at all for a period, the master switch in Settings stops capture completely.
Why does it need location "all the time"?
Because a drive that only records while you are looking at your phone is not automatic. Background location is what lets the log build itself while the app is closed and the phone is in your pocket, which is the entire feature.
What does it do to my battery?
Ordinary background tracking is designed to be cheap: motion data does most of the watching and the GPS is only used once a drive is actually under way, which is exactly what the motion permission is for. The expensive screen is the live drive view, which holds your display awake deliberately; Recording a Drive explains when to use it.
I granted everything and it still is not recording.
Check the banner at the top of the screen first, because it names the actual cause. If it reads "Automatic tracking is not running", the switch is on and nothing is capturing: switch it off and on again in Settings. If there is no banner at all, tracking is armed, and the thing to check next is whether the drive was long enough to register, which Clearing Your Trip Inbox covers.
Do I have to share road speeds to use the app?
No. It is a separate switch, it can be turned off during setup or at any time afterwards in Settings, and turning it off changes nothing about your own mileage log.
What happens if I skip a step?
Setup continues, and the last stage lists what is still missing. Nothing is lost, and you can grant any of it later from Settings. The only step that cannot be skipped is the disclosure, because everything after it depends on you having read it.
What To Read Next
- Getting Around Backbuild Miles for the shape of the app and where everything lives.
- Clearing Your Trip Inbox for what to do with the trips that start arriving.
- Your Vehicles if you skipped the vehicle step.
- Pairing Your Vehicle to have the right vehicle chosen for you automatically.