

Writing, Formatting, and Page Layout
This guide teaches the everyday craft of a document: getting words on the page, making them look right, and controlling how the page itself is laid out. After it you will be able to place your caret precisely, apply headings and named styles that keep a long document consistent, and set page size, margins, columns, and section breaks for a professional deliverable. Every step here is the real editor, and none of it requires knowing a markup language.
The Editing Surface and Its Three Modes
After this section you will know how to write, where your caret goes, and how to switch between editing, suggesting, and read-only. A document opens in the editor as a formatted page. You type directly on it, and the toolbar and the Format menu apply formatting to your selection or at the caret.
A selector at the top right sets how you interact with the document:
- Editing makes your changes directly to the document.
- Suggesting records your changes as tracked suggestions an author can accept or reject, rather than applying them outright. This is the redlining mode, covered in Tracked Changes.
- Viewing is read-only: you can read and navigate without any risk of changing the text.
The modes available to you match your access to the document. Someone with Editor access sees all three; someone shared in at the Suggester, Commenter, or Viewer level sees the modes that level allows. Sharing and access levels are covered in Collaboration and Sharing.
One small thing that matters more than it sounds: you can click anywhere to place the caret, including the margin, past the end of a short line, or below the last line of text. The editor drops the caret where you clicked, the way a familiar word processor does, so you are never fighting the page to type where you mean to.
Do I have to save my work? No. Every change is written to the live copy as you make it, and File, Save (or Ctrl+S) only confirms that it is saved. Nothing is lost if your connection drops or you close the tab; your document is where you left it when you come back. Version history (see Importing and Exporting) keeps named and automatic snapshots you can return to.
Text Formatting: Marks and Fonts
After this section you will be able to apply every character-level format a professional document needs. Select text and apply it from the toolbar or the Format menu:
- Emphasis: bold, italic, underline, and strikethrough.
- Scientific notation: superscript and subscript for units, footnote marks, and chemical or mathematical notation.
- Font family and size, text color, and highlight color.
- Typographic effects: small caps and related effects for headings and title pages.
Formatting applies to whatever is selected, or, if nothing is selected, to what you type next from the caret.
Named Styles and Linked Styles
After this section you will keep a long document consistent without formatting each heading by hand. Instead of manually bolding and resizing every heading, apply a named style, Heading 1, Heading 2, a body style, a caption style, and every place that uses it stays in step. Change the style once and every paragraph using it updates. This is what keeps a fifty-page report from drifting into a dozen slightly different heading looks, the classic frustration of formatting a long document by hand.
Backbuild Docs supports both paragraph styles (which format a whole paragraph) and character styles (which format a run of text inside a paragraph), plus linked styles: a single style with a paragraph half and a character half. Apply it to a whole paragraph and you get the paragraph formatting; apply it to a selection inside a paragraph and you get just the character formatting. A heading and its run-in variant stay defined together, so they never diverge.
Will my styles and formatting survive when I export? In a printed PDF, all of it. An export to Word or OpenDocument keeps your headings, alignment, character formatting, and tables, but your own named styles, nested list levels, images, and page setup do not carry over. See Importing and Exporting for the format-by-format detail.
Paragraph and Page Formatting
After this section you will control the shape of a paragraph and the look of the page. Paragraph formatting covers alignment (left, right, center, justified), indentation, line spacing, spacing before and after a paragraph, borders and shading, a drop cap, text direction for right-to-left scripts, and line and legal numbering. Page-level formatting covers a page color, a page border, a watermark, headers and footers, page numbers and dates, and cover or blank pages.
Page Setup: Size, Orientation, and Margins
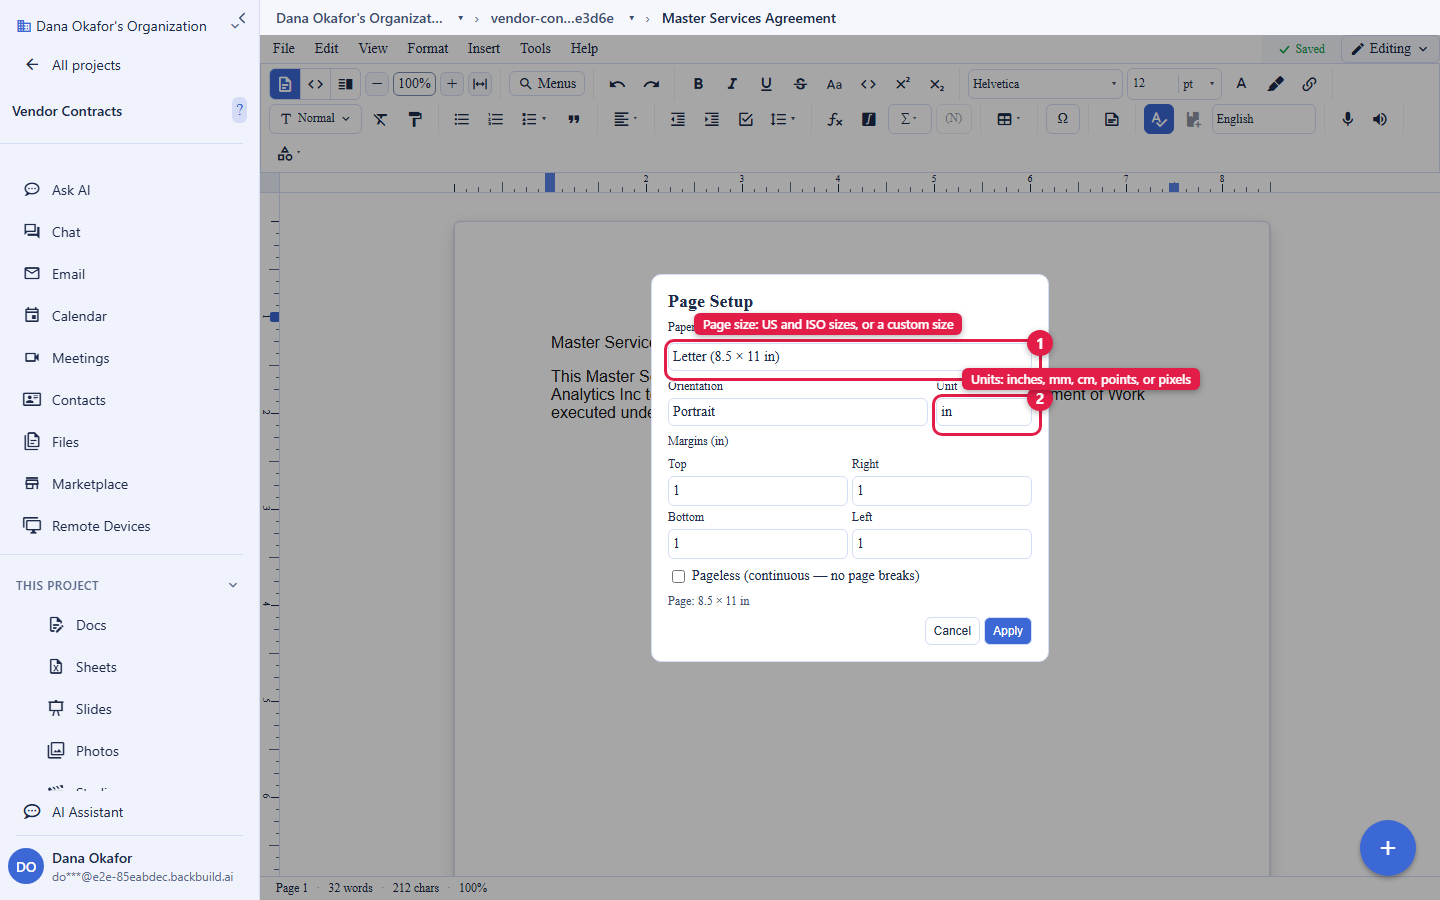
After this section you will set the physical page for print or for a pageless surface. Open Page Setup to control the page itself:
- Page size: a catalog of US and ISO A and B sizes, or a custom size you type in.
- Orientation: portrait or landscape.
- Units: inches, millimeters, centimeters, points, or pixels. The ruler and every measurement follow the unit you choose.
- Paged or pageless: switch between a paginated document with real page boundaries (for anything you will print or submit) and a continuous pageless surface (for a document that only ever lives on screen). Pageless is available on the Backbuild Lite, Pro, and Enterprise plans, or with Backbuild Prove or Backbuild Science. See Paged View.
New documents start with one-inch margins. The margin you see on screen is the real document margin, not a preview approximation, so what you lay out is what prints.
Paged View: Your Document on Real Pages
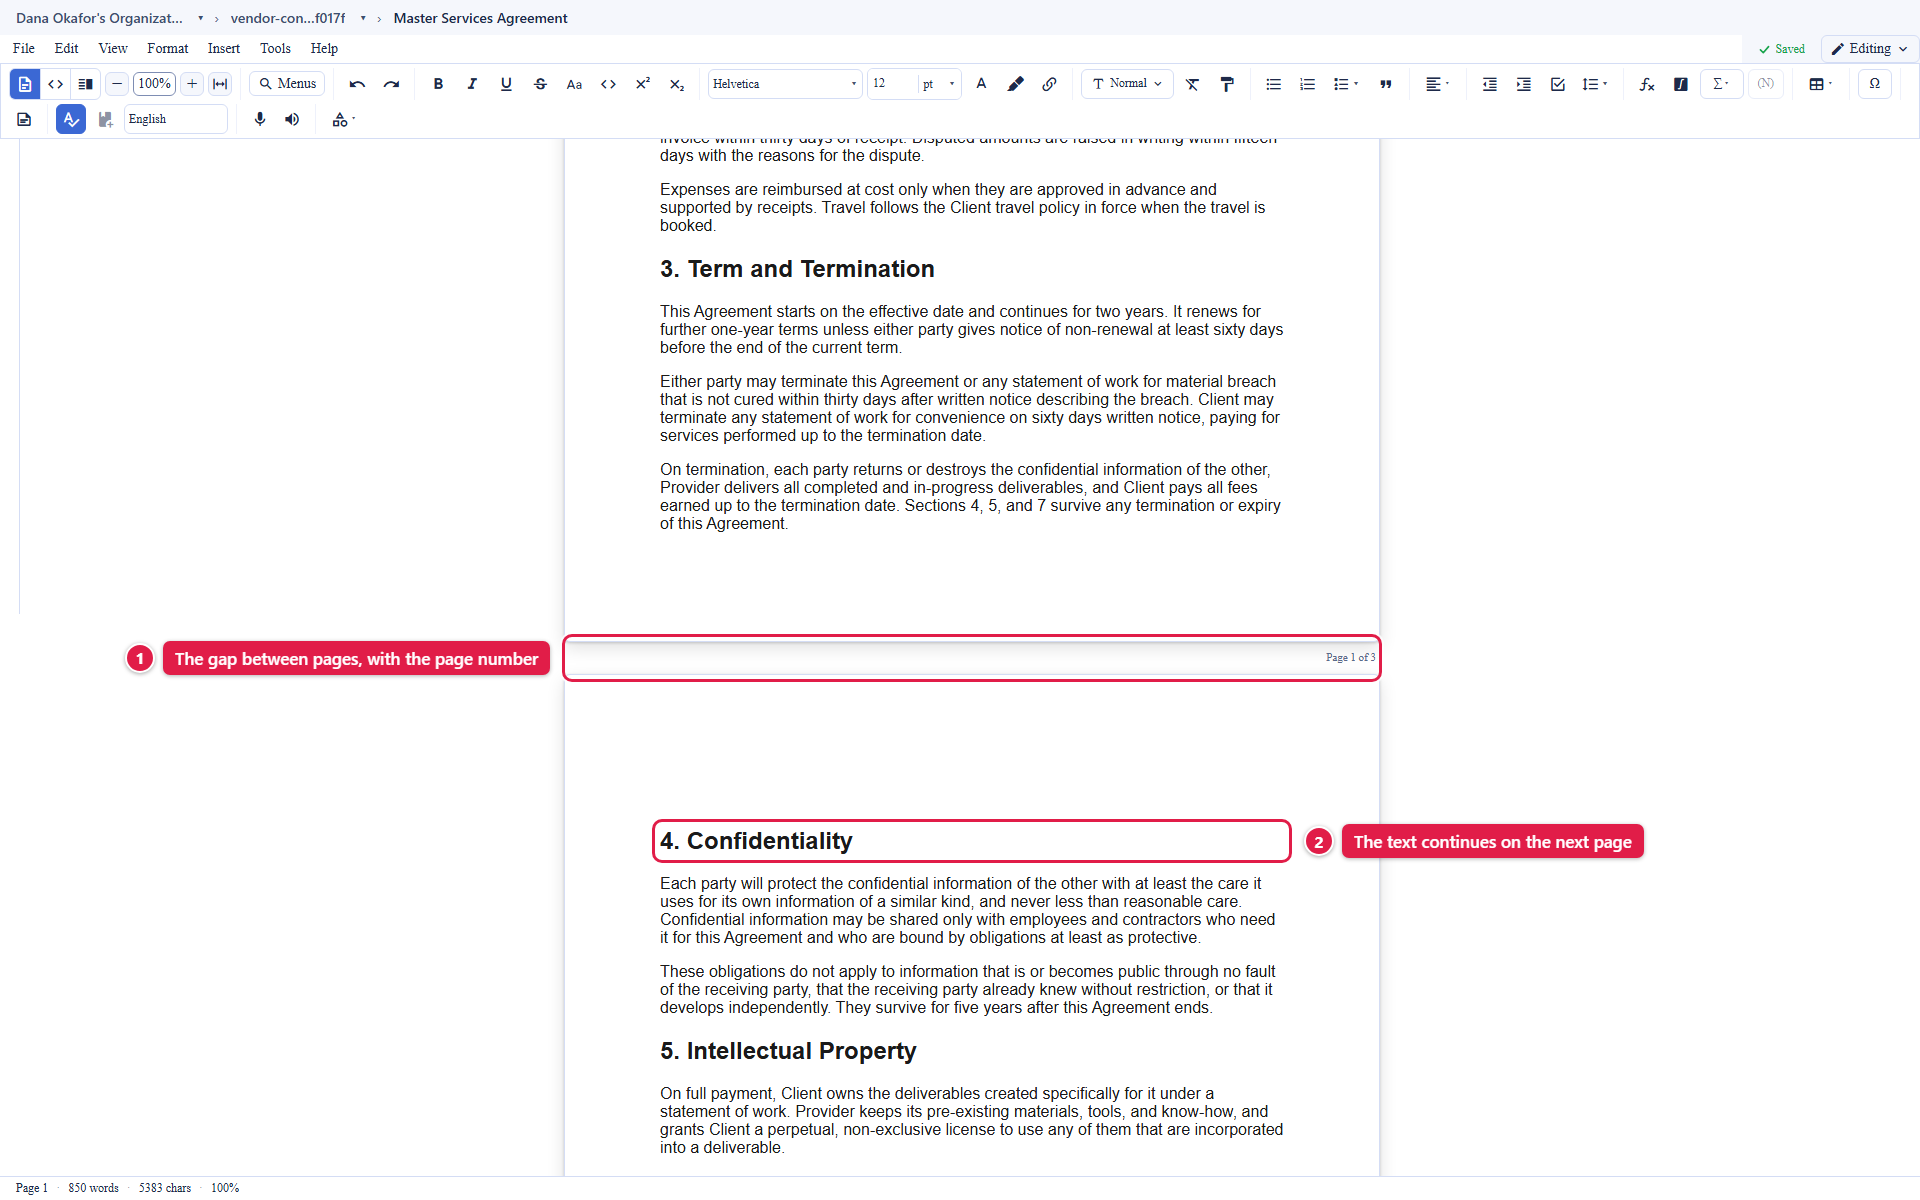
After this section you will know how a long document is laid out on pages while you write, and what to expect at a page boundary. A new document opens in paged view (Pageless turned off in Page Setup). In paged view the document is laid out on separate page sheets of the size, orientation, and margins you set, one after another. When the text fills a page it continues at the top of the next sheet, and the pages reflow as you type, paste, add images, or change the page size, orientation, or margins. A page number, such as "Page 1 of 3", sits in the gap below every page but the last.
- Start a new page yourself. A page break, a next-page section break, or a paragraph set to start on a new page always begins a new sheet. Two page breaks in a row leave a blank page between them.
- Blocks move whole. On screen, a paragraph, table, image, or equation that does not fit in the space left on a page moves to the next page as a whole; it is not split across two pages. A heading is placed on its own, so it can stay at the bottom of a page while the paragraph after it moves to the next; insert a page break before the heading to keep them together. A block taller than a whole page starts on a new page and runs across the boundary into the next one.
- Headers and footers. On screen, the header and footer show on the first page.
- Printing and PDF. Printing, including printing to PDF, lays out its pages on its own from the same document, so a printed page break can fall in a slightly different place than on screen. The on-screen pages never add anything to the document: what you save, share, and export is the same in paged and pageless view.
- Very long documents. Past 2,000 pages, paged view stops drawing page sheets and suggests switching to Pageless; the whole document stays editable.
Turn on Pageless in Page Setup when a document only ever lives on screen: the page sheets give way to one continuous surface. Everyone working on the document sees its pages laid out for their own screen, so collaborators never disturb each other's view by scrolling or resizing.
The Ruler, Margins, and Indents
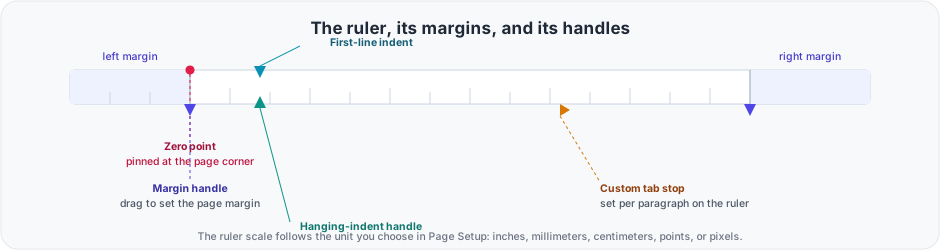
After this section you will adjust margins and indents by dragging, and trust the numbers. A live ruler runs along the top of the page. Its zero point is pinned to the page corner and stays correct as you zoom and pan, and its scale follows the unit you picked in Page Setup. Drag the margin handles to change the page margins, and the indent handles to change a paragraph's indentation, with a fine step (for example one-hundredth of an inch) so you can land on an exact measurement rather than a rough one.
Multi-Column Text
After this section you will lay text out in newspaper-style columns. Set two, three, or four balanced columns, with a gap between them and an optional separator rule. Add or remove a column from the ruler's right-click menu, choose a column layout from the Insert menu, and insert a column break to push the following text to the top of the next column. Columns are what a newsletter, a brochure, or a two-column conference paper needs, and they flow and balance automatically as you edit.
Section Breaks
After this section you will change layout partway through a document. A section break splits a document into independently laid-out sections. Insert a next-page break to start the following section on a new page, or a continuous break to change layout without a page break, and give each section its own column count from one to four. A one-column introduction followed by a two-column body is a section break away. The break renders as a labelled divider so you can see where one section ends and the next begins.
Tab Stops
After this section you will align text into clean columns without a table. Pressing Tab advances the caret to the next tab stop. A default grid is in place out of the box, and you can set custom tab stops per paragraph on the ruler for precise alignment, for a signature block, a simple price list, or a form. Custom tab positions are a display convenience of the live document; if you export to LaTeX and back, custom tab positions are not preserved, so use a table where the alignment must survive every round-trip.
Mailing-Label and Badge Grids
After this section you will turn a page into a sheet of labels. From the Insert menu, choose Labels and pick an Avery preset (thirteen common templates are built in). The page is set to that label or badge sheet's size and margins, and a grid of label cells is inserted at the caret, one editable cell per label, with the right cell size and spacing, so you type each label's text in place. This is the fast path to printing a run of mailing labels or event badges from one document. Adjusting the grid's rows and columns from the ruler is not available yet.
Can several people format the same document at once without stepping on each other? Yes. Formatting is just another kind of edit, and edits from every author merge automatically, so one person restyling headings while another types body text do not collide. See Collaboration and Sharing for how live co-editing works.
How do I get a PDF of my formatted document? Use File then Print and save as PDF through your browser or system print dialog. The document renders live as you write, so what you see is what prints. For a journal or preprint, download the LaTeX source (available on the Backbuild Lite, Pro, and Enterprise plans, or with Backbuild Prove or Backbuild Science); your journal or pipeline compiles it to PDF. Both paths are covered in Importing and Exporting.
Where to Go Next
- Real-Time Collaboration, Comments, and Sharing: bring co-authors in and control who can do what.
- Images, Tables, Math, and Citations: add the objects a real document needs.
- Importing and Exporting: bring existing work in and produce the deliverable.