

Calendars, Sharing, and Find a Time
This guide covers everything about more than one calendar: working with separate calendars and overlaying them, controlling who can see what with the four access tiers, sharing a calendar from the calendar screen, following calendars shared with you, and reading availability to find a slot that works. After this page you will run several calendars cleanly, share exactly the right amount, and stop trading availability emails.
Keep Separate Calendars, See Them in One Grid
After this section you will organize your schedule into calendars and turn them on and off at will. You start with a primary calendar. More calendars of your own, one for personal time, a project, or a team, are created through the REST API today, each with a name, an optional description, a time zone, and a default color; the app does not yet have a control to create, delete, or recolor a calendar. The primary calendar is pinned and cannot be removed; a secondary calendar can be deleted through the REST API when you no longer need it.
The left rail lists your calendars under My calendars (the ones you own or administer) and Other calendars (ones shared to you). Each row is a checkbox: tick it to show that calendar's events in the grid, untick it to hide them. This is how an assistant or a manager overlays several people's calendars at once and reads them as one schedule, then hides all but one to focus. Your visibility choices are remembered for you across sessions.
- Per-viewer color: a calendar's color can be overridden for your own view only, without changing what anyone else sees; today that is done through the REST API, not in the app.
- Star on the primary: your primary calendar is marked with a star in the list.
- Hide everything: untick every calendar and the grid is empty; tick the ones you want back.
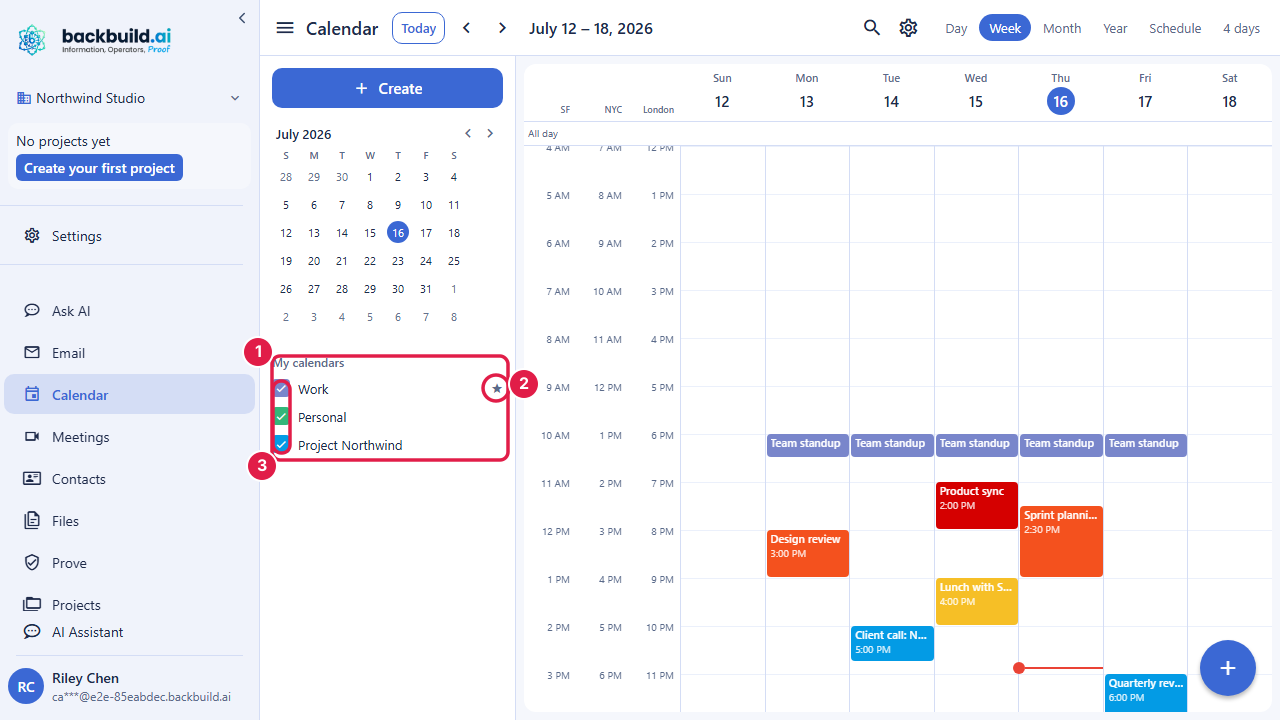
How do I set up one shared schedule so my small team stops double-booking? Put the shared events on a calendar the team can see, and have each person overlay it in their own grid. Everyone reads the same events in real time, so an open slot is an open slot for all of you. Combine that with the free-busy read below to confirm a time before you book it.
The Four Access Tiers
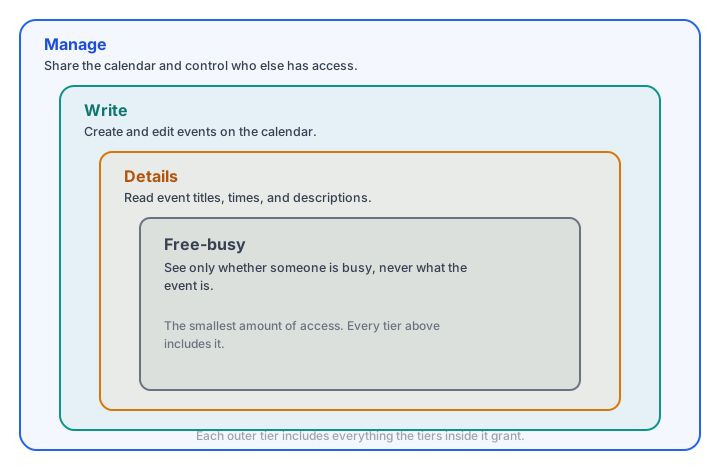
After this section you will know exactly what each level of access lets a person see and do. Sharing in Backbuild Calendar is built on four nested tiers. Each tier includes everything below it, so you grant the least a person needs:
- Free-busy (Free/busy in the sharing dialog): the person sees only that you are busy or free at a given time, never a title or any detail. This is the right level for letting someone schedule around you without reading your day.
- Details: the person can read event titles, descriptions, locations, and guests. An event marked Private still shows to them only as busy, unless they are on it. This is the level for a teammate who needs to know what is on the calendar.
- Edit: the person can create and edit events on the calendar, and so also reads the details of its private events. This is the level for a co-owner of a shared team calendar.
- Manage: the person can administer the calendar, including its sharing. This is the highest level and should go only to a trusted co-administrator.
A calendar also has a public-visibility setting, set through the REST API, that governs exposure beyond your organization: none, free-busy only, or details. Leave it at none unless you deliberately want a calendar readable outside your organization. Public calendar sharing is an organization setting that is off unless your organization turns it on: while it is off, a calendar cannot be set above none, no event can be published, and nothing on any calendar is shown outside your organization. The setting is checked again every time a calendar feed or a published event is opened, so turning it off stops what was already shared. An organization owner or admin turns it on, and can also cap the highest tier members may grant, through the organization settings in the REST API; the app does not have a switch for these two settings yet. A published event shows its time and only the fields chosen when it was published, such as its title, description, or location; never its guest list or its attachments.
How granular is sharing, free-busy only versus see-details versus edit? Those are exactly the tiers: free-busy for availability only, details to read the events, edit to make changes, and manage to administer. You pick the tier per person, group, department, or project, so an assistant can be given edit while a wider team gets only free-busy.
Following Calendars Shared With You
After this section you will work with calendars other people have shared to you. A calendar shared to you appears under Other calendars in the left rail. Tick it to overlay it and read it at the tier you were granted: a free-busy share shows busy blocks, a details share shows the events themselves. You cannot add events to a calendar unless you were given the edit tier, which is why it will not appear in the event editor's calendar picker until then.
Share a Calendar From the Calendar Screen
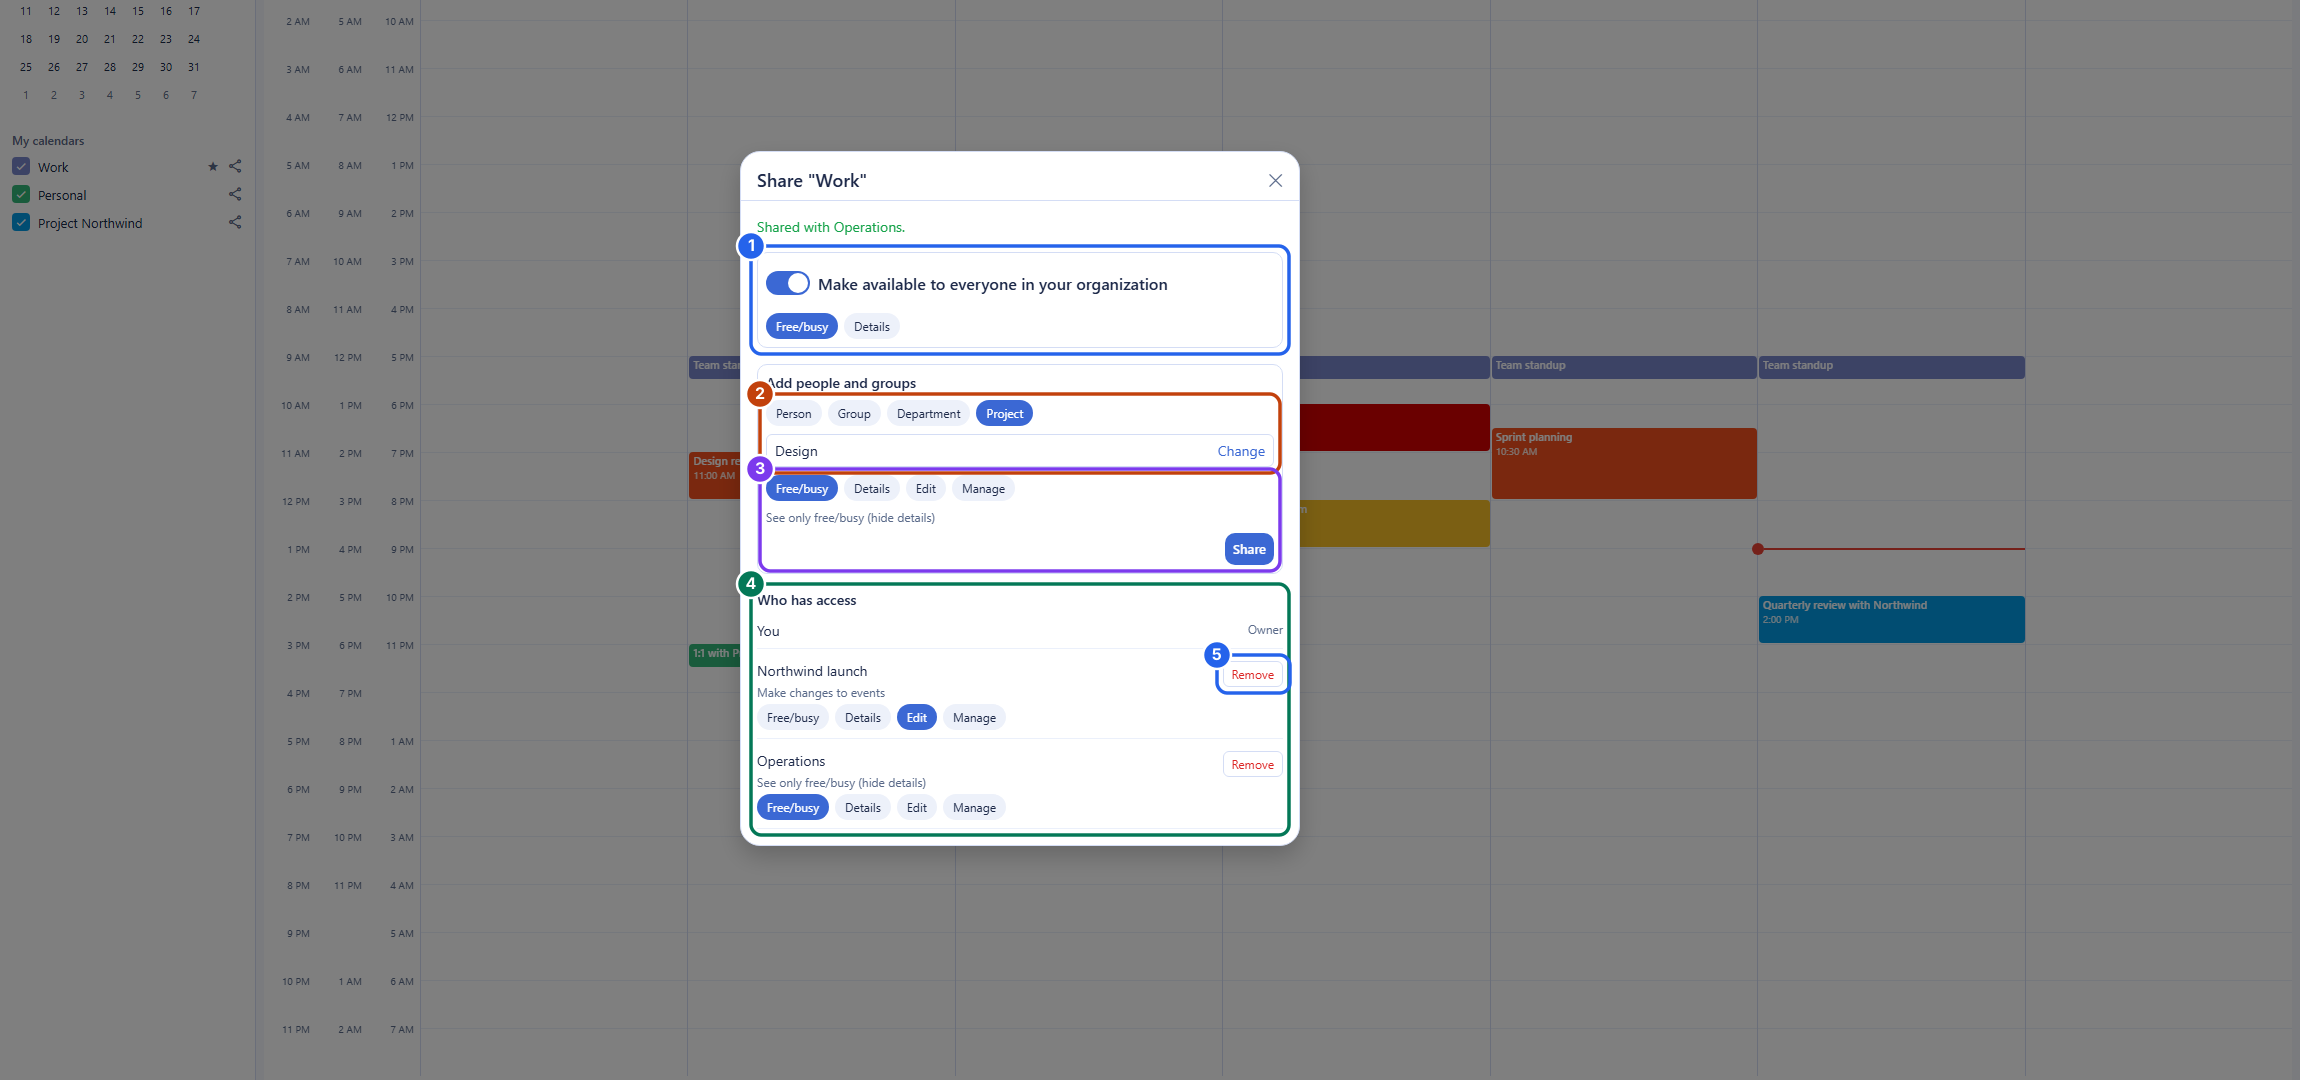
After this section you will share a calendar with exactly the people who need it, at exactly the right tier. In the left rail, every calendar you manage has a Share button (the share icon beside its name). Select it to open the sharing dialog for that calendar. You need the manage tier on a calendar to share it; you always have it on your own.
- Everyone in your organization: turn on Make available to everyone in your organization and choose free-busy or details. Everyone in your organization gets that access, including people who join later; turn it off to take it away.
- People, groups, departments, and projects: under Add people and groups, choose Person, Group, Department, or Project, search by name, pick the one you want, choose the tier, and select Share. A share to a group, department, or project follows its membership: someone who joins gets the calendar, and someone who leaves it loses the calendar.
- Change a tier in place: Who has access lists you as the owner and every share with its tier. Choose another tier on a row to change it, or select Remove to end that share.
- Your organization's limit: when your organization caps the highest tier its members may grant, the dialog names that limit, and the tiers above it cannot be chosen.
- Public share: when your organization allows public calendar sharing, a Public share switch appears. It gives everyone in your organization the chosen access and does not publish the calendar outside it. If public sharing is later turned off for your organization, an existing public share can still be removed, but not changed or created again.
Every change is checked by the server, so the dialog can never grant more than you are allowed to. The other person sees the change when they next open their calendar, within about a minute of it. A calendar shared with you appears under Other calendars, at the tier you were given.
What the app does not offer yet: approving a request to follow your calendar, and a dedicated "manage on behalf of" screen for acting as another person. The manage tier lets a co-administrator edit a calendar and manage its sharing, which covers many delegation needs. Shares can also be managed through the Backbuild REST API; see the API reference.
Can I manage someone else's calendar and act on their behalf? If they share their calendar with you at the edit tier, you can create and edit its events; at the manage tier you can also manage its sharing. A dedicated screen for acting as another person, from your own calendar, is not in the app yet, and we would rather tell you that than imply a screen that is not there.
Find a Time With Free-Busy
After this section you will pick a meeting time that works for everyone without seeing anyone's private events. In the app, ask each person to share their calendar with you at the free-busy tier, then tick those calendars in the left rail: the grid shows their busy blocks side by side, never the contents of an event you are not allowed to see, so an open slot across all of them is a time that works. A screen that lines up several people's availability for you is not in the app yet. From code, a free-busy query through the REST API returns the busy intervals across the calendars or the members of your organization you name, under the same server-enforced boundary: the answer is "busy", full stop.
Can I see the whole team's free-busy to find a time that works? Yes, by overlaying their calendars: each person shares at the free-busy tier, and you tick their calendars to see every busy block in one grid. A dedicated find-a-time screen is not in the app yet; the REST API offers a free-busy query across calendars or members.
Booking Pages and Automated Scheduling
After this section you will know what to expect on client self-booking. A public booking page (a link a client opens to pick an open slot with you, the way an appointment scheduler works) is coming soon, and the pricing page marks it as such. The automated rules that ride with booking, such as round-robin assignment, buffers between meetings, and daily booking limits, arrive with it and are not available today.
Until then, the way to prevent double-booking is the one above: keep shared events on a calendar the team overlays, and read free-busy before you commit a time. If a public self-booking page is your defining requirement today, weigh that honestly; everything else about running a shared, availability-aware calendar is here now.
Is there a public booking page where clients self-book, like a dedicated scheduler? Not yet; booking pages are coming soon. Today you keep client records in Backbuild Contacts, create events and invite clients, and manage availability with shared free-busy. When booking pages ship, they build on the same calendar you are already using.