

Secrets from the CLI
This guide teaches you to run your applications with secrets injected at
launch instead of scattered across .env files. By the end you will have
authorized your machine against the zero-knowledge vault, verified the
authorization the right way, wired secrets run into your
daily workflow, and learned the grant lifecycle well enough to manage a
whole team's machines.
Why Replace .env Files
A .env file is a plaintext copy of your most sensitive values sitting in your working tree, one careless commit away from a repository and one backup away from places you never intended. Multiply that by every developer machine and every project checkout, and "where are our secrets" stops having an answer.
The Backbuild Secrets CLI inverts the model: secrets live encrypted in the vault, your machine is explicitly authorized to read them, and values are injected into your process's environment at the moment you launch it. Nothing is written to disk, there is one authoritative copy, and removing a machine's access is one action instead of a hunt.
How the Vault Protects You
Three properties define the security model you are working with:
- Zero-knowledge encryption. Vault contents are encrypted on your device with keys derived from your vault master password, using hybrid post-quantum cryptography. Backbuild stores only ciphertext and cannot read your secrets. Decryption happens locally, on the machine you authorized.
- Machine identity. Each machine gets its own identity keypair with a human-readable fingerprint. Access is granted to a specific machine, scoped to specific vaults, with an expiry. You always know which machines can read what.
- OS keystore required. The CLI stores machine keys in your operating system's secure keystore and refuses to operate without one. Keys are never dropped into a dotfile.
Step 1: Create Your Machine Identity
On the machine that needs vault access, generate its identity keypair:
backbuild secrets keygenThis creates two hybrid post-quantum keypairs for the machine: an encryption keypair (X25519 paired with ML-KEM-768) that lets the vault deliver secrets only this machine can open, and a signing keypair (Ed25519 paired with ML-DSA-65) that proves requests came from it. Both secret keys are sealed in your operating system's secure keystore, never written to a dotfile, and the command refuses to run if no keystore is available.
The command prints the machine's fingerprint, a short human-comparable
string derived from the encryption public key that uniquely identifies this
machine. You will compare this fingerprint during authorization, so keep the
terminal open or note it. Running keygen again with
--force rotates the identity, which invalidates existing
authorizations for the old one. In practice you rarely run
keygen yourself: login bootstraps an identity
automatically the first time you use it. Check the current identity's
fingerprint and key state at any time with:
backbuild secrets status status is local only: it reads nothing from the network and
prints the active profile, its fingerprint, and whether the sealed key is
present. It exits non-zero if the profile has no identity yet, which is your
signal to run login.
Step 2: Authorize the Machine
Authorization is a deliberate ceremony, not a silent token exchange. After this section you will know exactly what each step proves.
backbuild secrets login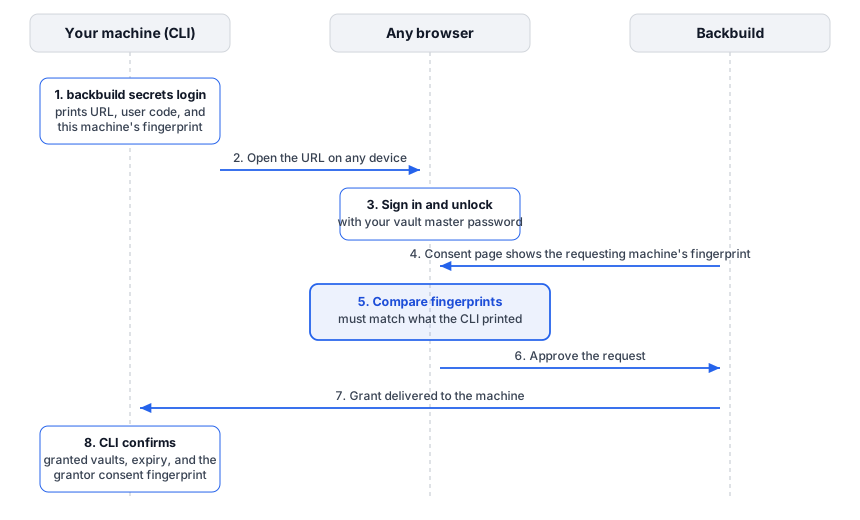
- The CLI prints a verification URL and a short user code. Open the URL in any browser on any device. This is why the flow works from SSH sessions and headless machines: the browser does not need to be on the same computer.
- You authorize in the browser. Sign in to your account and review the request. The consent page shows the requesting machine's fingerprint, asks for your vault master password to unlock, and then requires a fresh second-factor confirmation before anything is granted, even inside a signed-in session.
- Compare the fingerprints. The fingerprint on the consent page must match the one your CLI printed. A match proves you are authorizing your machine's key, not an attacker's machine that raced you to the code.
- Choose what to grant, approve, and the CLI confirms. You pick the vault to grant; only an owner of that vault can approve a machine for it. The CLI then prints the vaults you were granted, the grant's expiry, and a grantor consent fingerprint. Comparing that value out-of-band closes the loop in the other direction: the grant your machine received is the one you approved.
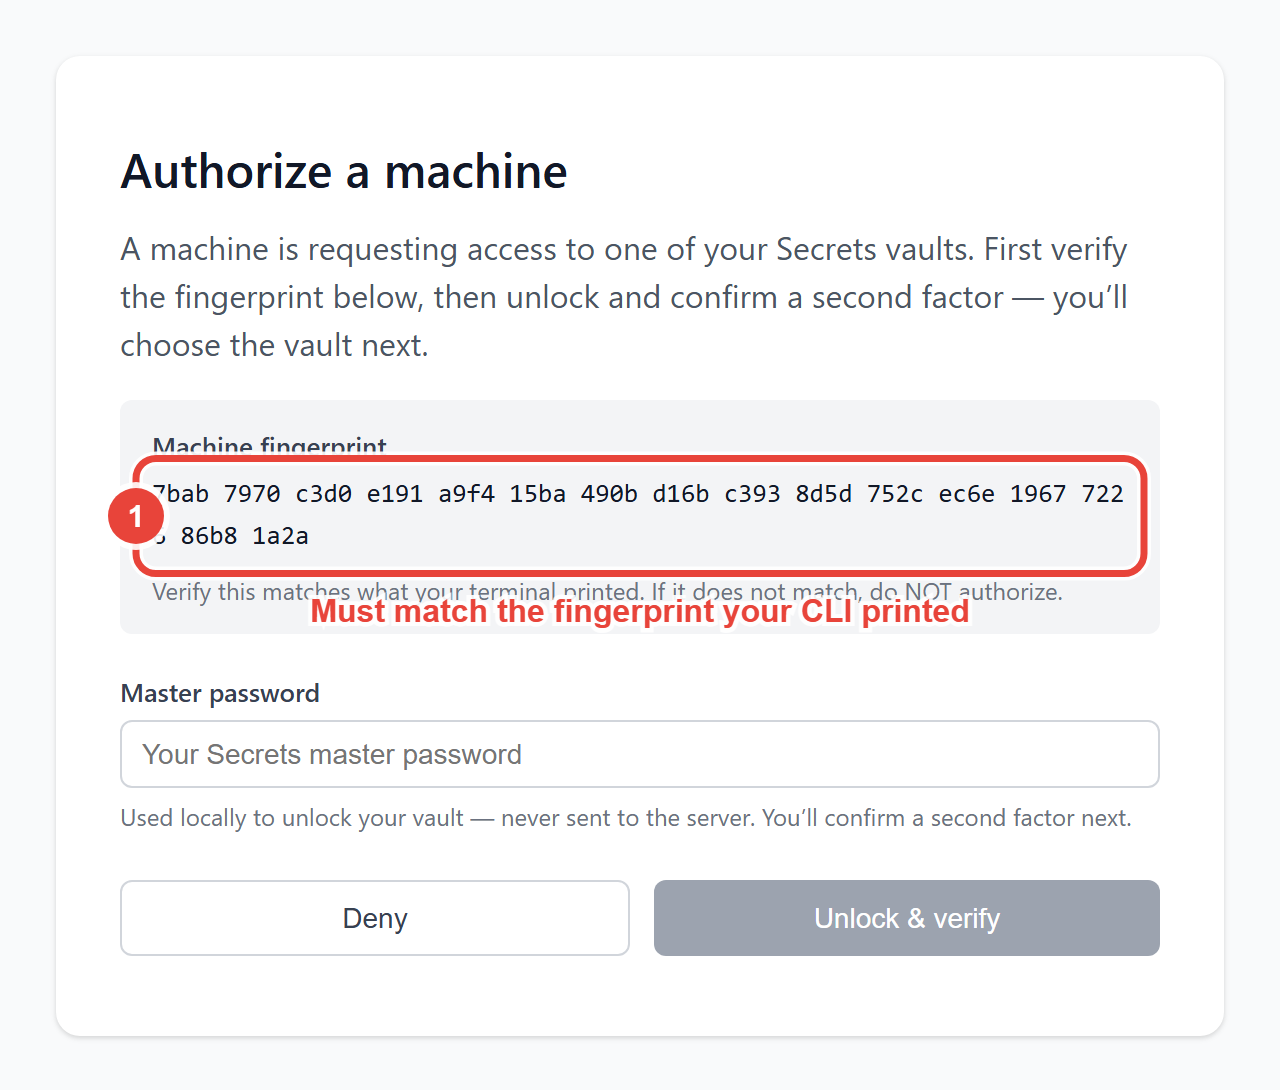
Only approve a code that you initiated moments ago on a machine you control. If a code or authorization request ever arrives unprompted, by chat, email, or a colleague "just needing a quick approve", decline it. Unsolicited approval requests are how device-authorization phishing works, and declining is always the correct answer.
Profiles: One Machine, Several Environments
A profile is an isolated slot that holds one machine identity and one
authorization. Every secrets subcommand accepts
--profile NAME, and the profile in effect is resolved in this
order: the --profile flag, then the
BACKBUILD_PROFILE environment variable, then a profile literally
named default. If you never mention profiles, everything happens
under default and a single-account machine never has to think
about them.
Profiles matter the moment one machine needs to reach more than one place.
A profile is bound to a single control plane and vault, and that binding is
fixed at login time from the environment you selected (an
explicit BACKBUILD_API_BASE, otherwise
BACKBUILD_ENV), then frozen into the grant. So a profile pins
both where your secrets live and which vault you consented
to. Give each destination its own profile, and one workstation or CI runner
can hold independent grants side by side: for example a
production profile and a staging profile, or one
profile per project vault.
# Authorize this machine against your production deployment
BACKBUILD_ENV=production backbuild secrets login --profile production

# Authorize the same machine against a separate staging deployment
BACKBUILD_ENV=staging backbuild secrets login --profile staging

# Now run each app against the right vault, no ambiguity
backbuild secrets run --profile production -- ./deploy.sh
backbuild secrets run --profile staging -- npm run dev

# Or make one profile the default for a whole shell session
export BACKBUILD_PROFILE=staging
backbuild secrets get
Because a profile owns its own identity and grant, revoking or rotating one
never touches the others, and backbuild secrets status --profile
production reports that profile's fingerprint independently. Profile
names may contain letters, digits, hyphens, and underscores, must start with
a letter or digit, and are limited to 64 characters; dots and slashes are
rejected so a profile name is always safe to use in a path.
Everyday Use
Run your app with secrets injected
This is the command that replaces the .env file. It launches any command with your vault secrets projected into that process's environment:
# Instead of copying and editing a .env file
backbuild secrets run -- npm run dev

# Any command works
backbuild secrets run -- python manage.py runserver

# Scope to one vault, then run
backbuild secrets run --vault VAULT_ID -- ./deploy.sh
Put a bare -- between the CLI's own options and the command you
want to run. Everything after -- is treated as the child
command and its arguments verbatim, so flags meant for your program (a
--vault or --profile your app happens to define,
for instance) are never mistaken for the CLI's. The separator is optional
for a simple command, but making it a habit keeps the boundary
unambiguous.
Secrets exist only in the launched process's environment, only for its
lifetime. Nothing is written to disk, nothing lingers in your shell
environment after the process exits, and there is no file to accidentally
commit. Before the command starts, the CLI prints how many secrets it
injected, for example Injected 3 secret(s) into the environment.
Refuse to start without the secrets you need
Add --require NAME, once per name, to make the run refuse to
start when a variable your program depends on would be missing:
# Start only if both variables will be set
backbuild secrets run --require DATABASE_URL --require STRIPE_API_KEY -- npm start
Each name is compared after the same normalization the projection uses
(upper case, non-alphanumerics become underscores; see
How fields become
environment variables below). If any required name is
absent, the CLI prints required secret(s) missing: with the
names, exits 1, and never starts the command, so a deploy fails
at once instead of running half-configured. A required name that is empty or
is one of the refused loader names is a usage error (exit 2).
On Windows, secrets run also refuses a command that resolves to
the WSL launcher (for example a bare bash that Windows finds in
its system folder), because an injected Windows environment does not cross
into WSL and the secrets would be silently dropped. Run Git Bash by its full
path, or call the interpreter (node, python)
directly. The check runs before the vault is fetched.
How fields become environment variables
Each field in the vault becomes one environment variable. The name is built
from the item's title and the field's label, joined as
TITLE_LABEL: uppercased, with every character that is not a
letter or digit turned into an underscore, and a leading underscore added if
the result would start with a digit. A field labelled api key
on an item titled Stripe arrives as
STRIPE_API_KEY. When the title and the label are the same, the
name is used once: a field labelled STRIPE_KEY on an item titled
STRIPE_KEY arrives as STRIPE_KEY. When two fields
would produce the same name, the later one wins and the CLI says so.
Two safety rules run at this projection step, so nothing in the vault can
subvert the process you launch. Names that control a program's loader or
shell (such as PATH, IFS, LD_*,
DYLD_*, BASH_FUNC_*, NODE_OPTIONS,
PYTHONPATH, and GIT_SSH) are refused rather than
injected, and a value containing a newline or other control byte is refused
too, because it could smuggle extra assignments. Refusals are reported as
warnings; the command still runs with the safe variables in place.
Read a secret
# List your items; every value is masked
backbuild secrets get

# Show the values in the listing (needs the vault owner's approval)
backbuild secrets get --reveal

# Print one field's value (needs the vault owner's approval)
backbuild secrets get --reveal --name DATABASE_URL

# Dump all items and values as JSON (needs the vault owner's approval)
backbuild secrets get --reveal --json
The server only ever returns ciphertext; the values are decrypted locally on
your authorized machine. By default the listing masks every value, so a
screen share, a pasted terminal log, or a recorded demo does not become an
incident. Printing a value is a reveal, and every reveal
asks the vault owner who authorized the machine: a prompt appears in their
Backbuild app showing what is being asked for and by which machine, and
they approve it with a fresh authenticator code or security key, or deny
it. The CLI waits up to five minutes and prints the value once, after
approval; a denied request exits 3, and a request nobody
decides is rejected after five minutes and exits 4. Any mode
that would print a plaintext value also requires --reveal:
the listing with --reveal, a single field with
--name (or the identical --field), and the
machine-readable --json all refuse to run without it, before
anything is requested.
To use a value rather than see it, use secrets run:
it needs no approval.
--name matches a field's label, compared
case-insensitively, not the item's title. It prints exactly that one value
and nothing else, which is what a script or a pipe wants; if no field carries
that label the command exits non-zero. Treat revealed output like the secret
it is: it goes to your terminal, or wherever you redirect it, on purpose.
Store a secret
# The value is read from stdin, never from the command line
backbuild secrets set --name STRIPE_KEY
# (paste the value, press Enter)

# Or pipe it
cat key.txt | backbuild secrets set --name STRIPE_KEY
set deliberately refuses a value passed as an argument.
Command-line arguments land in shell history and are visible to other
processes on the machine; stdin is neither. If you try to pass the value
positionally, you get a usage error, not a stored secret. It creates the
item if the name is new and updates it in place if it already exists (an
upsert by title), so re-running set is how you rotate a value.
Writing requires a read-write grant, and on a multi-vault grant you name the
target with --vault ID.
Know the name a set secret projects to. set --name X stores an item titled X
holding a single field labelled X. Because the title
and the label are the same (see
How fields become
environment variables above), that field arrives under
secrets run as exactly X. Releases of the CLI
from before September 2026 projected it as X_X; if your app
finds nothing under X, update the CLI. When you need a
multi-field credential, create the item in the app (or copy it with
secrets copy) where you control the title and labels
independently.
Export when a file is unavoidable
backbuild secrets export --format dotenv
backbuild secrets export --format shell
backbuild secrets export --format json
Some tools insist on a file. export is a reveal, so the vault
owner approves it first, as above. It then writes plaintext to
standard output in dotenv, shell, or
json form, and from that moment the output is your
responsibility: redirect it somewhere safe, never into a tracked file,
and remember that shell redirection lines can end up in history and
build logs. Prefer secrets run whenever the tool allows an
environment variable, and treat export as the exception.
Sign a mobile release without exposing the keystore
Android signing keys are exactly the kind of long-lived, high-value secret
that should never sit on a build machine. secrets sign keeps the
keystore in the vault and lends it to the signer only for the length of one
run:
# Sign an app bundle with the keystore held in the vault
backbuild secrets sign --app MYAPP ./app-release.aab
The keystore is materialized to a private, owner-only file for the duration
of the signing command and then overwritten and removed, including if you
interrupt it. The keystore password is handed to the signing tool by
environment-variable name, never on the command line where other processes
could read it. By default the command reads the fields
KEYSTORE_B64, KEYSTORE_PASSWORD, and
KEY_ALIAS, each prefixed by --app (so
--app MYAPP reads MYAPP_KEYSTORE_B64 and its
siblings); these are vault field labels as listed by secrets get.
After signing, the CLI verifies the signature against the produced artifact
and reports the certificate's SHA-256 fingerprint; if verification does not
pass, it refuses and leaves your artifact untouched. The full flag set is in
the CLI Reference.
Copy a Vault to Another Environment
secrets copy reproduces one vault's contents into another,
faithfully and without ever printing a value. It reads and decrypts the
source vault locally, then re-encrypts each item verbatim under the target
vault's key and upserts it by title, preserving every item's title, each
field's label, value, and type, and the item's category. Because the titles
and labels are preserved exactly, the copied vault produces the identical
secrets run environment. This is what makes it the right tool for
seeding a staging deployment from your source of truth, or migrating a vault,
where set (single-field, one item at a time) cannot reproduce a
multi-field structured credential.
Copy works across the profiles you set up earlier: the source profile supplies a read grant, the target profile a read-write grant, and each can point at a different deployment. Always dry-run first to see exactly what would move:
# Preview: list titles, field counts, and categories; write nothing
backbuild secrets copy --from-profile production --to-profile staging --dry-run

# Do it for real
backbuild secrets copy --from-profile production --to-profile staging
A dry run prints one line per item, showing its title, how many fields it
has, and its category, and never a value, then confirms that nothing was
written. If either profile's grant covers more than one vault, name the ends
explicitly with --from-vault ID and --to-vault ID.
Copying a vault onto itself (the same deployment and the same vault) is
refused, since it could only overwrite the source with itself. Secret values
live only in memory for the length of the copy and are never displayed.
Working with Multiple Vaults
If your grant covers more than one vault, commands that read or write
require an explicit --vault ID. The CLI never silently picks
a vault for you, because "the wrong production database URL, quietly" is
exactly the class of surprise a secrets tool must not produce. Your
granted vault IDs are printed when the authorization completes, so note
them then; omitting --vault on a multi-vault grant gets a
clear error that lists the IDs your grant covers.
This is a different axis from
profiles. A profile
selects which control plane and authorization you are using;
--vault selects which vault within that one grant when
the grant happens to cover several. Use a separate profile per deployment,
and --vault only when a single grant spans more than one vault.
The Grant Lifecycle
Understanding grants end to end is what makes this manageable across a team:
- Scope: a grant covers specific vaults for one machine identity. Different machines get different grants.
- Expiry: grants expire. When one does, commands fail with a clear message telling you to run
backbuild secrets loginagain; nothing goes stale silently. - Ending access from the machine:
backbuild secrets logoutremoves the machine's authorization (add--yesto skip the confirmation). - Ending access from the vault side: an owner of the vault revokes the machine's grant over the REST API, by the fingerprint
secrets statusprints, after listing the vault's machine grants to find it (see How a machine grant ends). This is your offboarding lever: a departed laptop loses access without touching the machine itself. The Machines with access list on the vault's Sharing & permissions tab does not show machine grants yet. - Endings you do not have to trigger: a grant also ends when the person who approved it is removed from the vault or is no longer an owner of it, and stops working while their account in the organization is suspended or deactivated. Removing anyone from a vault normally rotates its key, which ends every machine grant on that vault; run
backbuild secrets loginagain on each machine that should keep access. - Identity health: if the machine identity is found broken or half-initialized, the CLI repairs it and warns you that the fingerprint changed. A changed fingerprint means previous grants no longer apply to this identity; authorize again and compare the new fingerprint.
CI and Shared Machines
A CI runner or build box is authorized the same way as a workstation, once, during setup:
- On the runner, run
backbuild secrets keygen, thenbackbuild secrets login. Because the approval happens in a browser on any device, you can complete it from your own machine using the printed URL and code. - Once authorized, jobs use
backbuild secrets runnon-interactively until the grant expires. A reveal (get --reveal,export) waits for the vault owner's approval, so do not build a job on one. - Grants expire by design, so schedule re-authorization into your runner maintenance rather than discovering expiry in a failed deploy. The expiry is printed when the grant is issued; record it in your runner maintenance schedule.
Two constraints to plan for: the runner needs an operating system secure
keystore available (the CLI refuses to store machine keys without one),
and each runner should have its own identity so revoking one machine
never disturbs the others. Secret values appear in output only when a job
reveals them with the vault owner's approval, and secrets run
masks the injected values in its command's output, which keeps CI logs
clean by default.
Troubleshooting
- "Grant expired" (or commands suddenly demand authorization): run
backbuild secrets loginagain and re-compare fingerprints. This is routine, not a fault. - The CLI refuses to run, citing no secure keystore: the machine has no OS keystore available. This is a protection, not a bug; enable your platform's keystore rather than looking for a way around it.
- Warning that the machine identity was repaired and the fingerprint changed: the old identity was unusable. Re-run
secrets loginand verify the new fingerprint on the consent page. - "Multiple vaults" error: pass
--vault IDexplicitly. The CLI will not choose for you. - "required secret(s) missing": a
--requirename was not produced by the vault's projection. Check the item title and field label withsecrets get, or that you are on the right profile and vault. - A machine that worked yesterday is refused today: its grant expired, the person who approved it is no longer an owner of the vault, or the vault key was rotated when someone was removed. Run
backbuild secrets loginagain. - On Windows,
secrets runrefusesbashas the WSL launcher: run Git Bash by its full path, or call the interpreter directly. - A command printed
***where a value was:secrets runmasks the injected values in its command's output on purpose. Use the value inside the command; to see it, reveal it withget --reveal --name, which the vault owner approves. - A reveal ended "denied" or "timed out": the vault owner denied it, or nobody decided within five minutes. Ask the owner, then run it again; nothing was printed.
- "update the backbuild CLI": the CLI is older than the service accepts. Install the current release.
- Your app cannot find a variable you stored with
set: aset --name Xsecret projects asX. A CLI release from before September 2026 projected it asX_X; update the CLI.
Frequently Asked Questions
Can Backbuild read my secrets?
No. Vault contents are encrypted on your device before upload and
decrypted only on machines you have authorized. The platform stores
ciphertext. This is also why nobody can email you a reset for your vault
master password.
What does the fingerprint comparison actually prove?
That the key being authorized is the one on your machine. The consent
page shows the requester's fingerprint; your CLI printed yours. If they
match, you authorized your machine. The grantor consent fingerprint the
CLI prints afterwards proves the reverse direction: the grant your
machine holds came from the approval you performed.
My laptop was lost or stolen. What is the blast radius?
Have an owner of the vault revoke that machine's grant over the REST API,
by its fingerprint, and the grant is dead; a key rotation, which removing
anyone from the vault normally triggers, ends every machine grant on it. The vault itself remains encrypted,
and the thief does not have your vault master password. Rotate any secrets
the machine had read, then get back to work.
Is secrets run really safer than a .env file?
Yes, categorically. A .env file is at-rest plaintext that every backup,
sync tool, and git add . can pick up. secrets run
puts values in one process's environment for one lifetime, with a single
revocable grant behind it and one authoritative copy in the vault. It also
replaces each injected value of four or more characters, and its base64,
URL-encoded and hex forms, with *** in the command's output,
including a value split across writes. Masking is best effort: a value the
command transforms another way, writes to a file or sends over the network
is not masked, and programs see pipes rather than a terminal.
Does the approval stop someone who controls the machine?
No. A machine you authorized holds a grant that can decrypt the vault, so
someone who controls that machine, or runs a modified client on it, can
read what the grant covers without asking. The approval governs the official
CLI and the service's own interfaces; it is not a substitute for revoking a
machine you no longer trust.
Does export defeat the purpose?
Used casually, it can. It exists for tools that cannot read environment
variables. Keep its output out of tracked files and logs, and reach for
it only when run cannot do the job.
Can one machine hold access to more than one environment at once?
Yes, with profiles. Authorize each destination under its own profile
(backbuild secrets login --profile production, then again with
--profile staging) and select one per command with
--profile or the BACKBUILD_PROFILE environment
variable. Each profile carries its own identity and grant, bound at login to
the control plane you chose, so they never interfere and revoking one leaves
the others intact.
How do I seed a staging vault from production without retyping every secret?
Use backbuild secrets copy --from-profile production --to-profile
staging. It reproduces every item faithfully, including multi-field
credentials and categories that set cannot express, so the
copied vault yields the same environment. Dry-run it first with
--dry-run to see exactly what would move, and note it never
prints a value.
Where is the vault's master password in all this?
You enter it in the browser during the authorization ceremony, never
into the CLI. See
the master
password explainer for what it is and why it is unrecoverable.
See Also
- CLI Reference: the full command surface, every flag, configuration, and exit codes
- Secrets for Machines, Integrations and AI Agents: grants for non-human identities and the use-without-seeing boundary
- Getting Started: account creation and the vault master password
- Security & RBAC: organization-level access control